THE Facialist Gestures
THE GESTURES BY OUR FACIALIST EXPERT
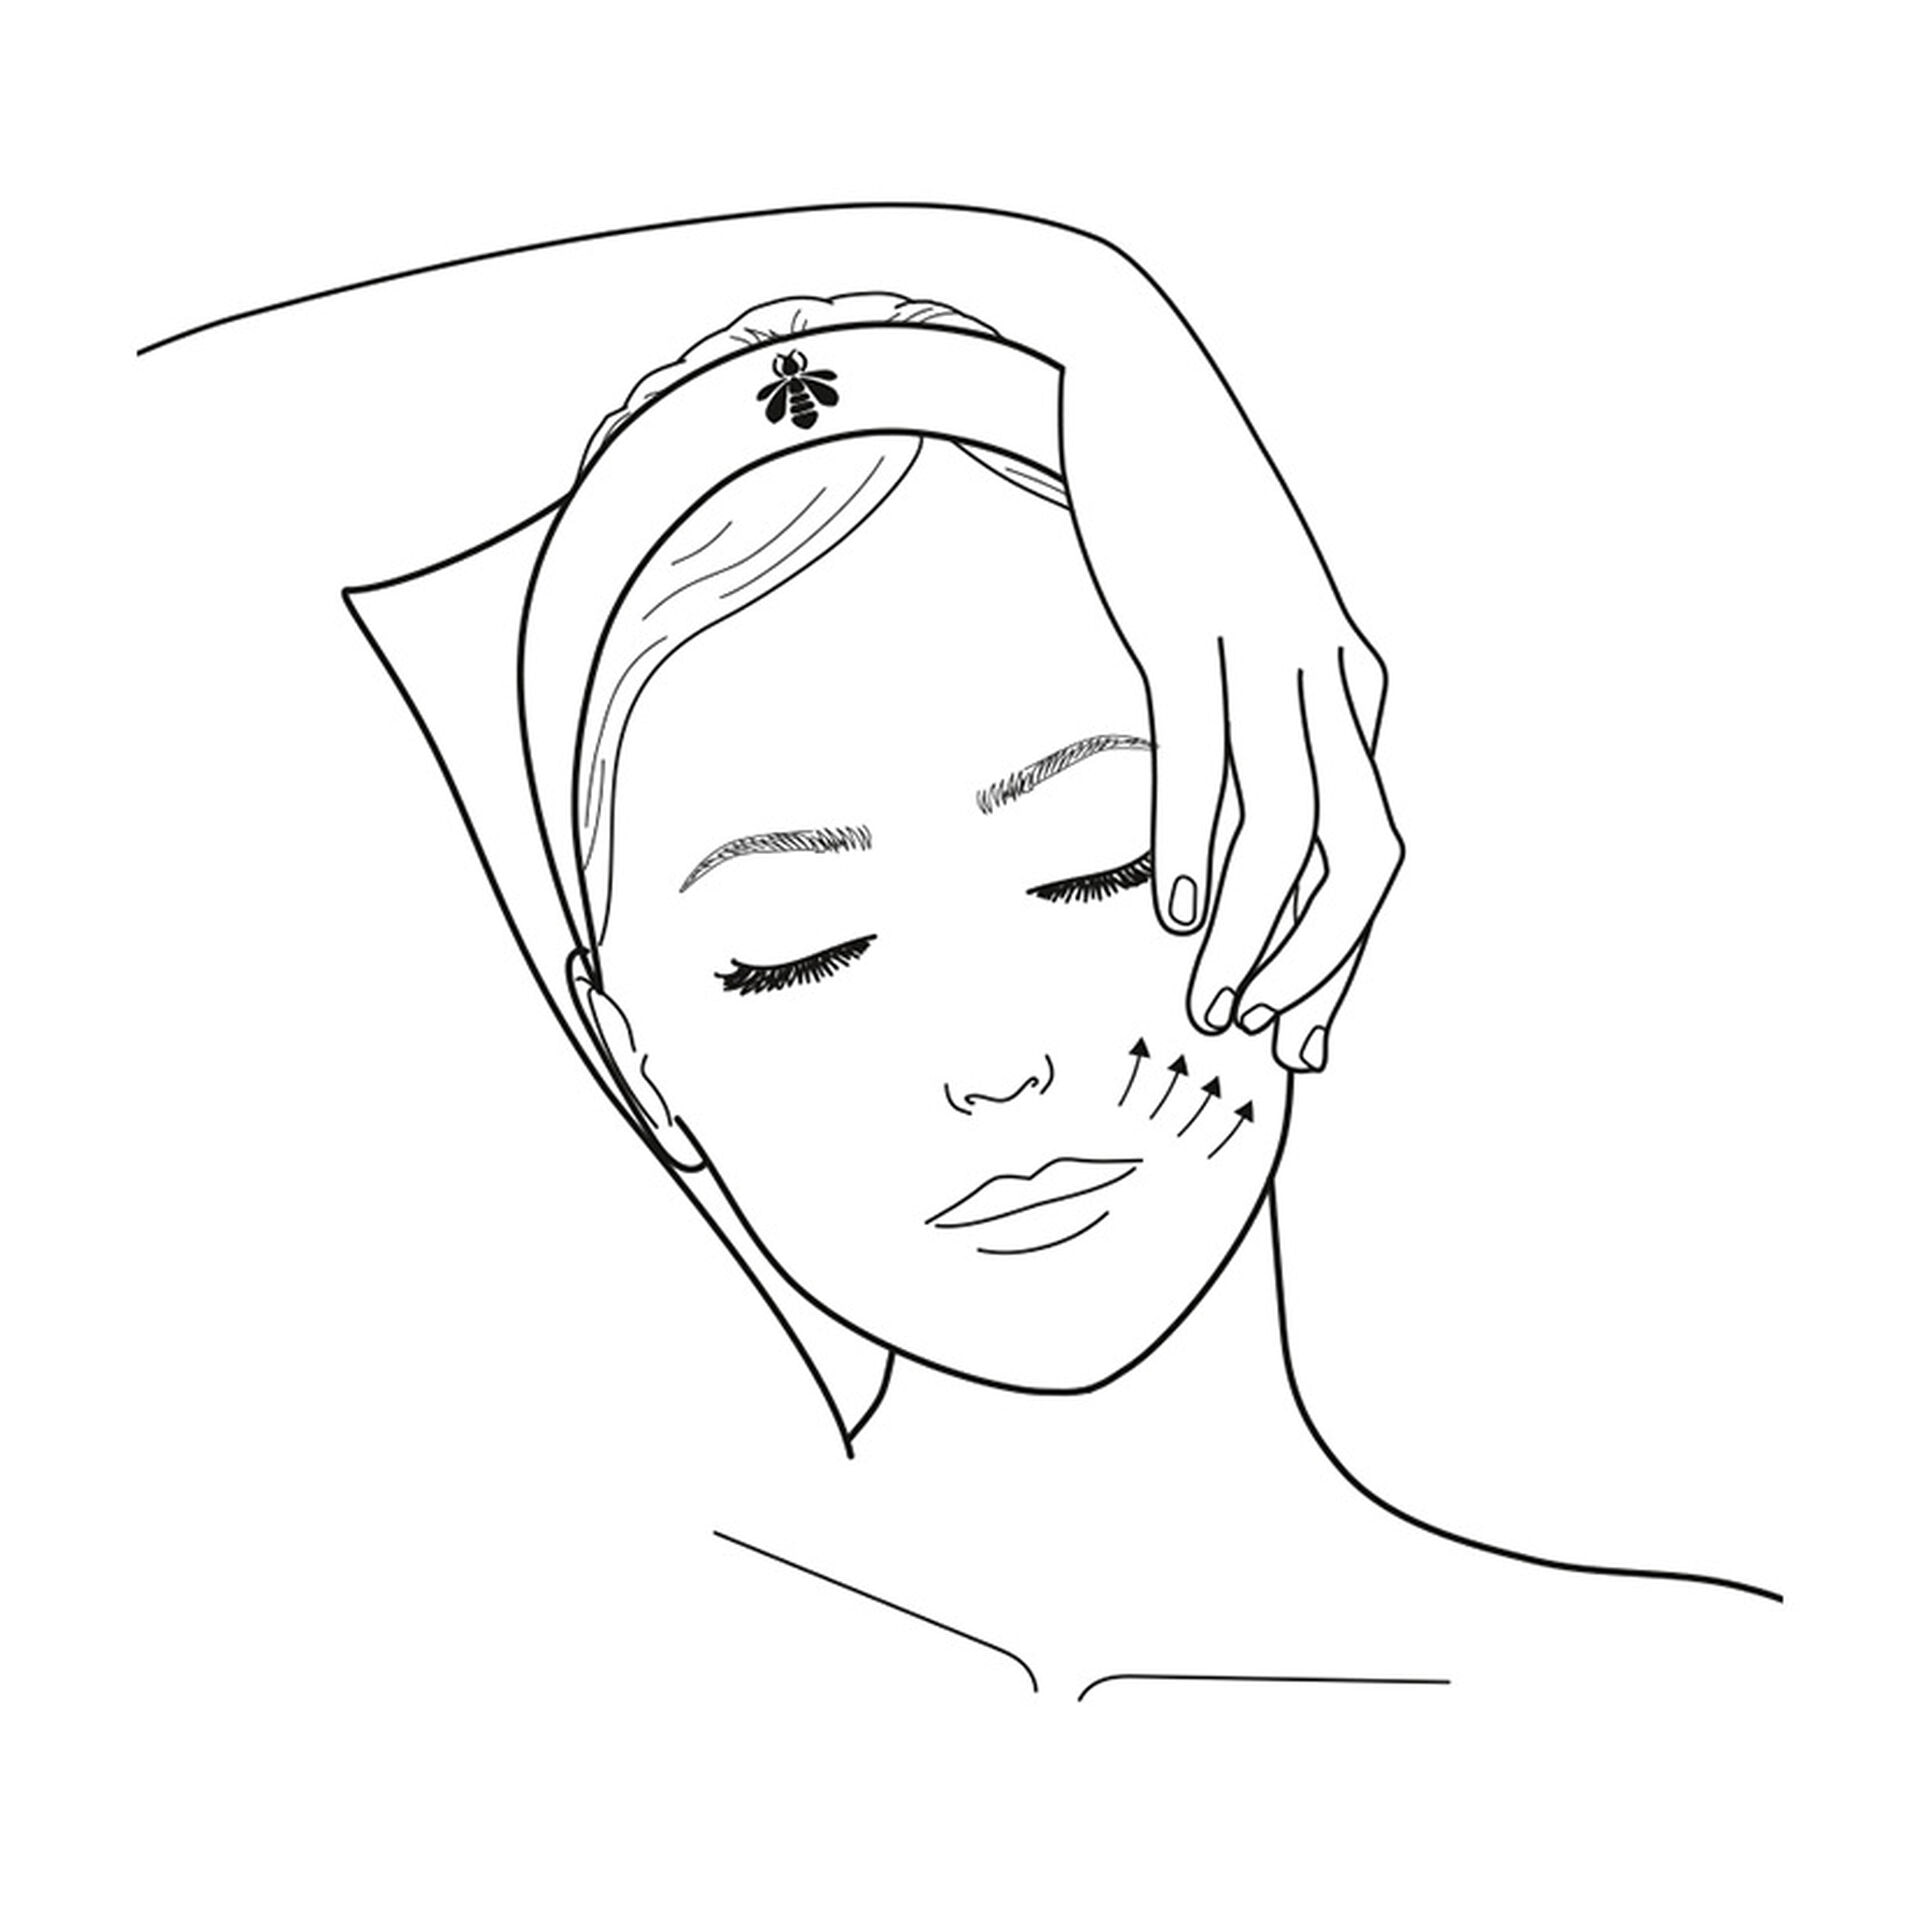
CHEEK AREA
PLUMP
To soften the line of the nasolabial fold, dynamic, intense and deep strokes are required.
• Raise the right elbow to the sky and tilt the head to the right.
• Position the index, middle and ring fingers of the right hand at the base of the left nasolabial fold.
• Walk the tips of all 3 fingers along the entire length of the nasolabial fold in an upwards direction.
• Repeat along the right nasolabial fold using the fingers of the left hand.


CHEEK AREA
TONE
To decongest and oxygenate the cheeks and smooth the nasolabial fold, it is necessary to drain any fluid in these areas.
• Using the outer edge of the index fingers, rub the nasolabial fold upwards and downwards.
• Gliding the outer edges of the index fingers towards the ears, stretch the nasolabial fold outwards.
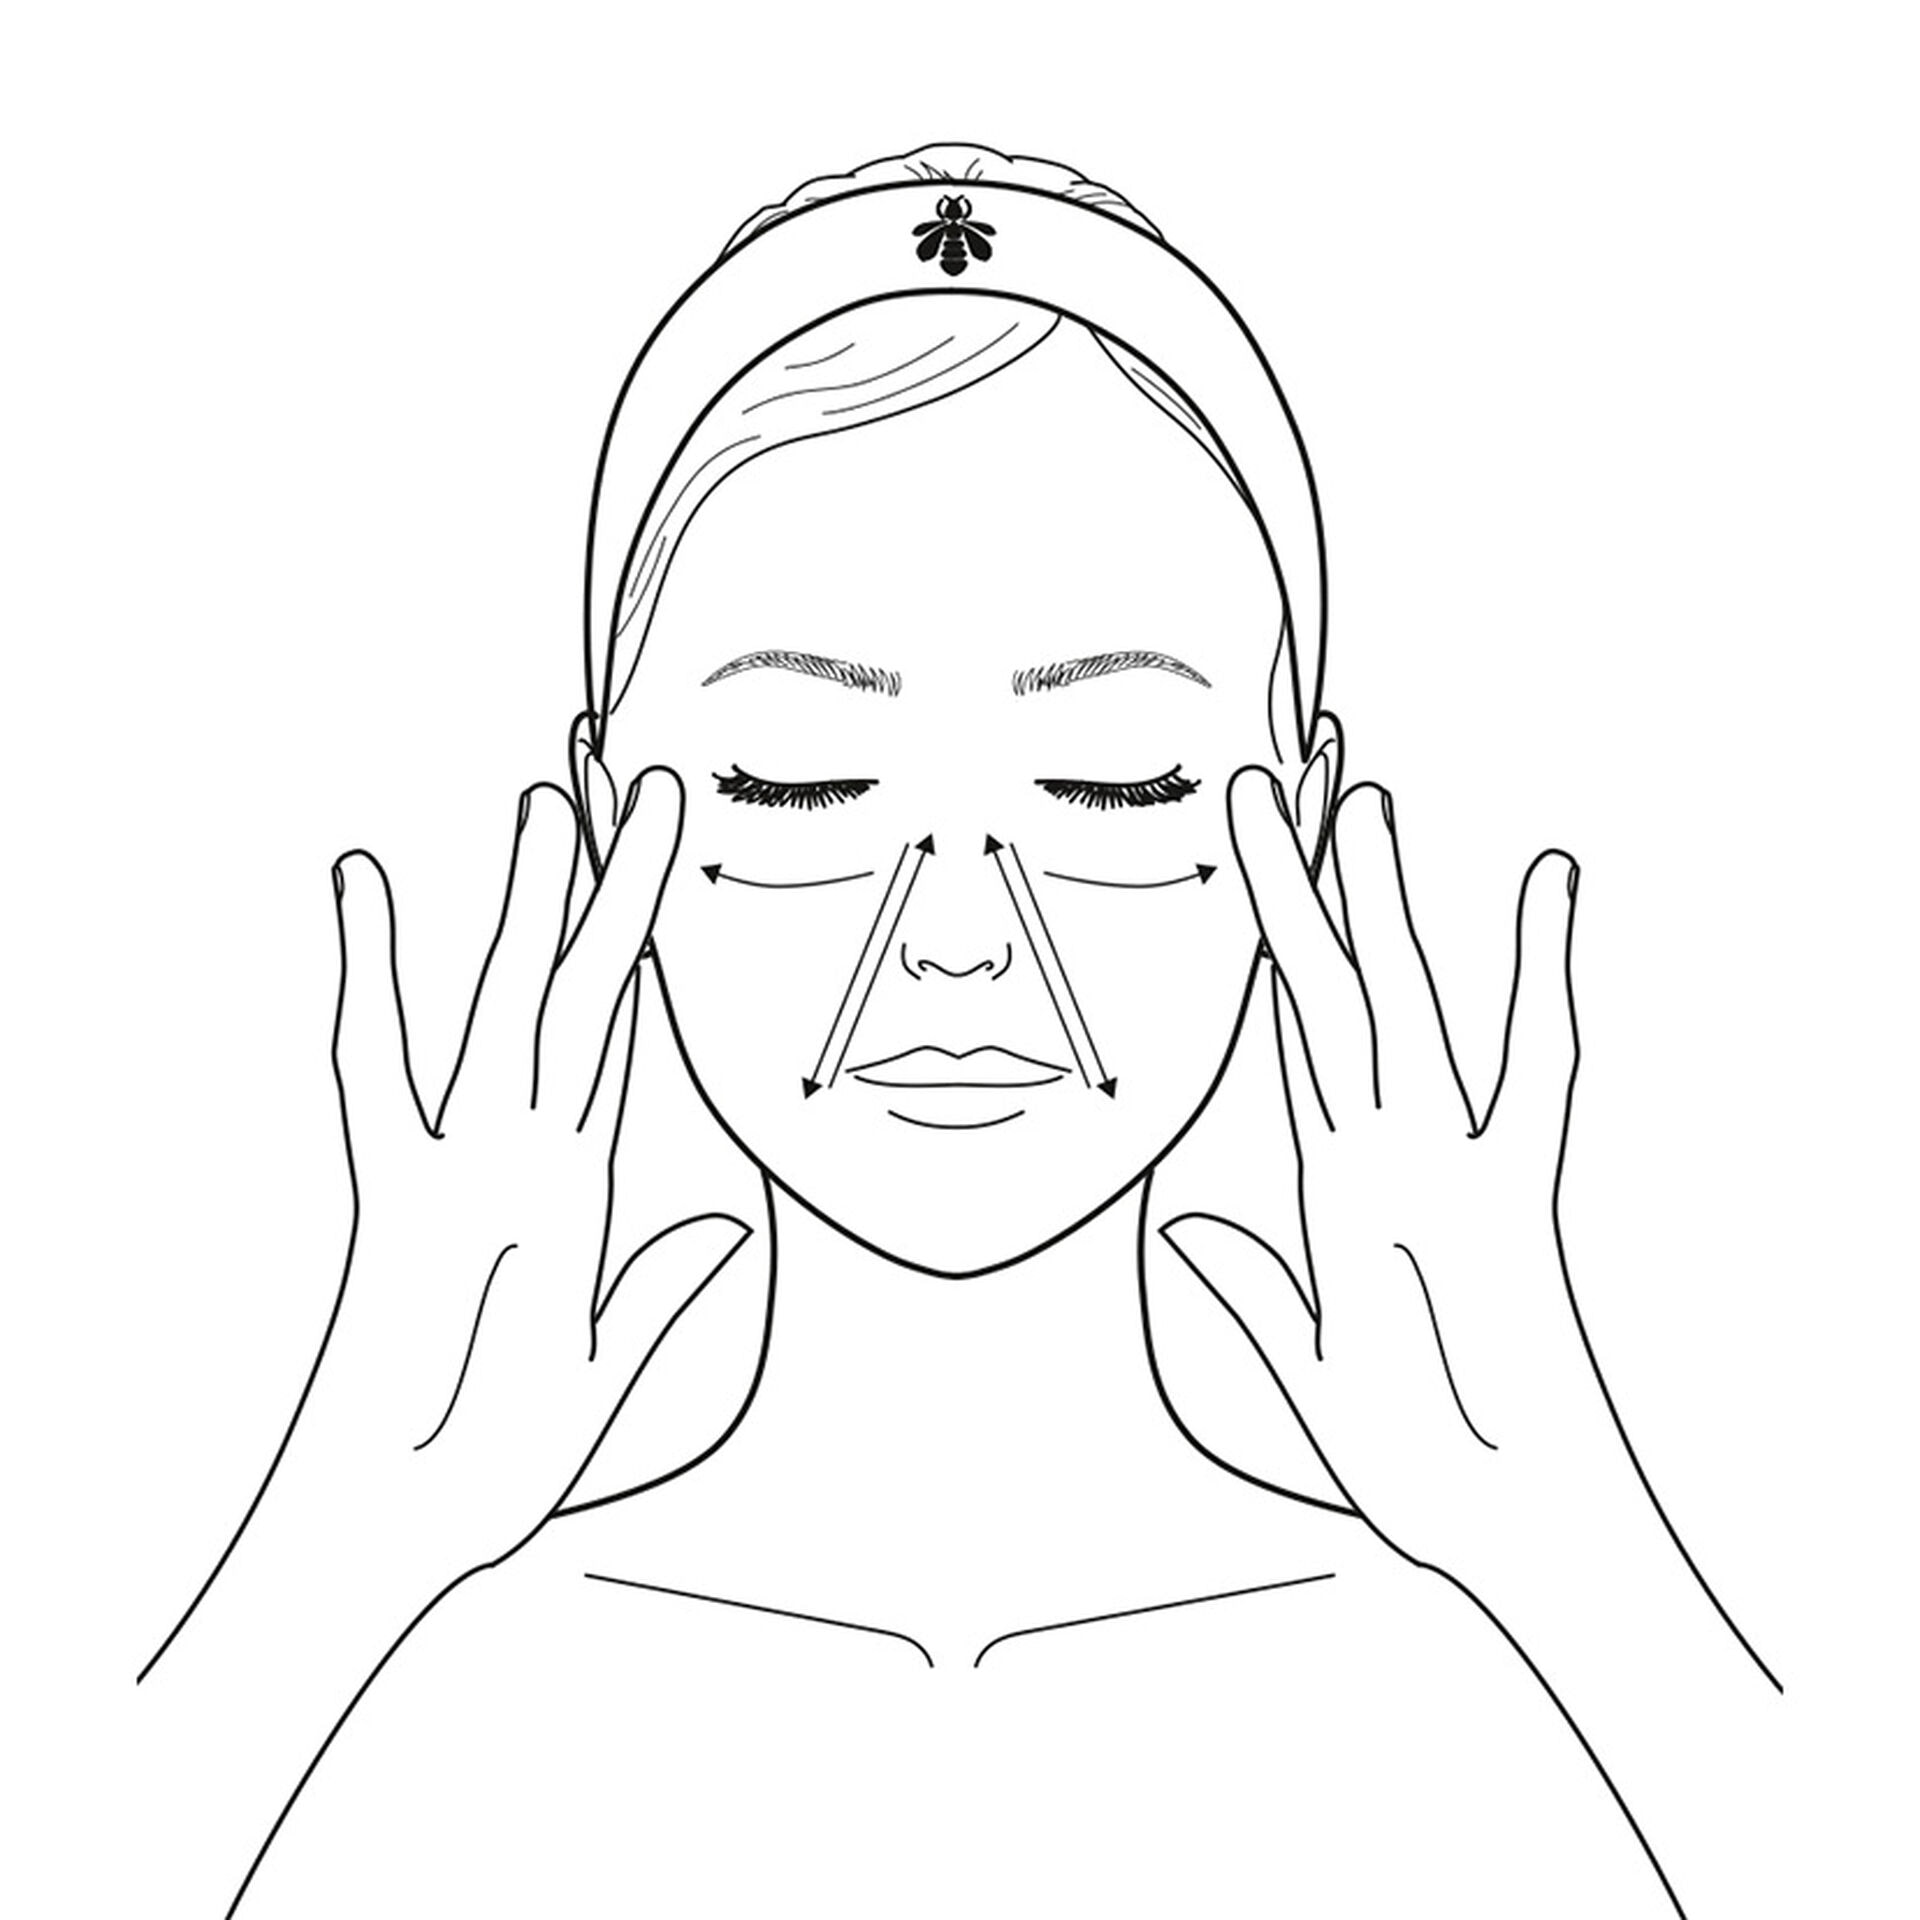
EYE AREA
DRAIN
To combat dark circles and puffiness, it is essential to drain the orbicularis oculi (eyelid muscles) twice a day.
• With the index and middle finger, smooth the contour of the eye with outward horizontal strokes, using alternate hands.
• Begin by smoothing under the right eye up to the temple.
• Repeat the movement beneath the eyebrow, lifting it slightly.
• Repeat around the left eye.


EYE AREA
LIFT
Strengthening the orbicularis oculi (eyelid muscles) is highly effective in order to lift the upper eyelid.
• Raise the right elbow to the sky then tilt the head to the right.
• With the arm bent, place the index, middle and ring fingers of the right hand on the left temple.
• Press and slide these 3 fingertips over the entire crow’s feet and eyebrow area, working outwards like the rays of the sun.
• Repeat on the right temple and eyebrow using the fingers of the left hand.
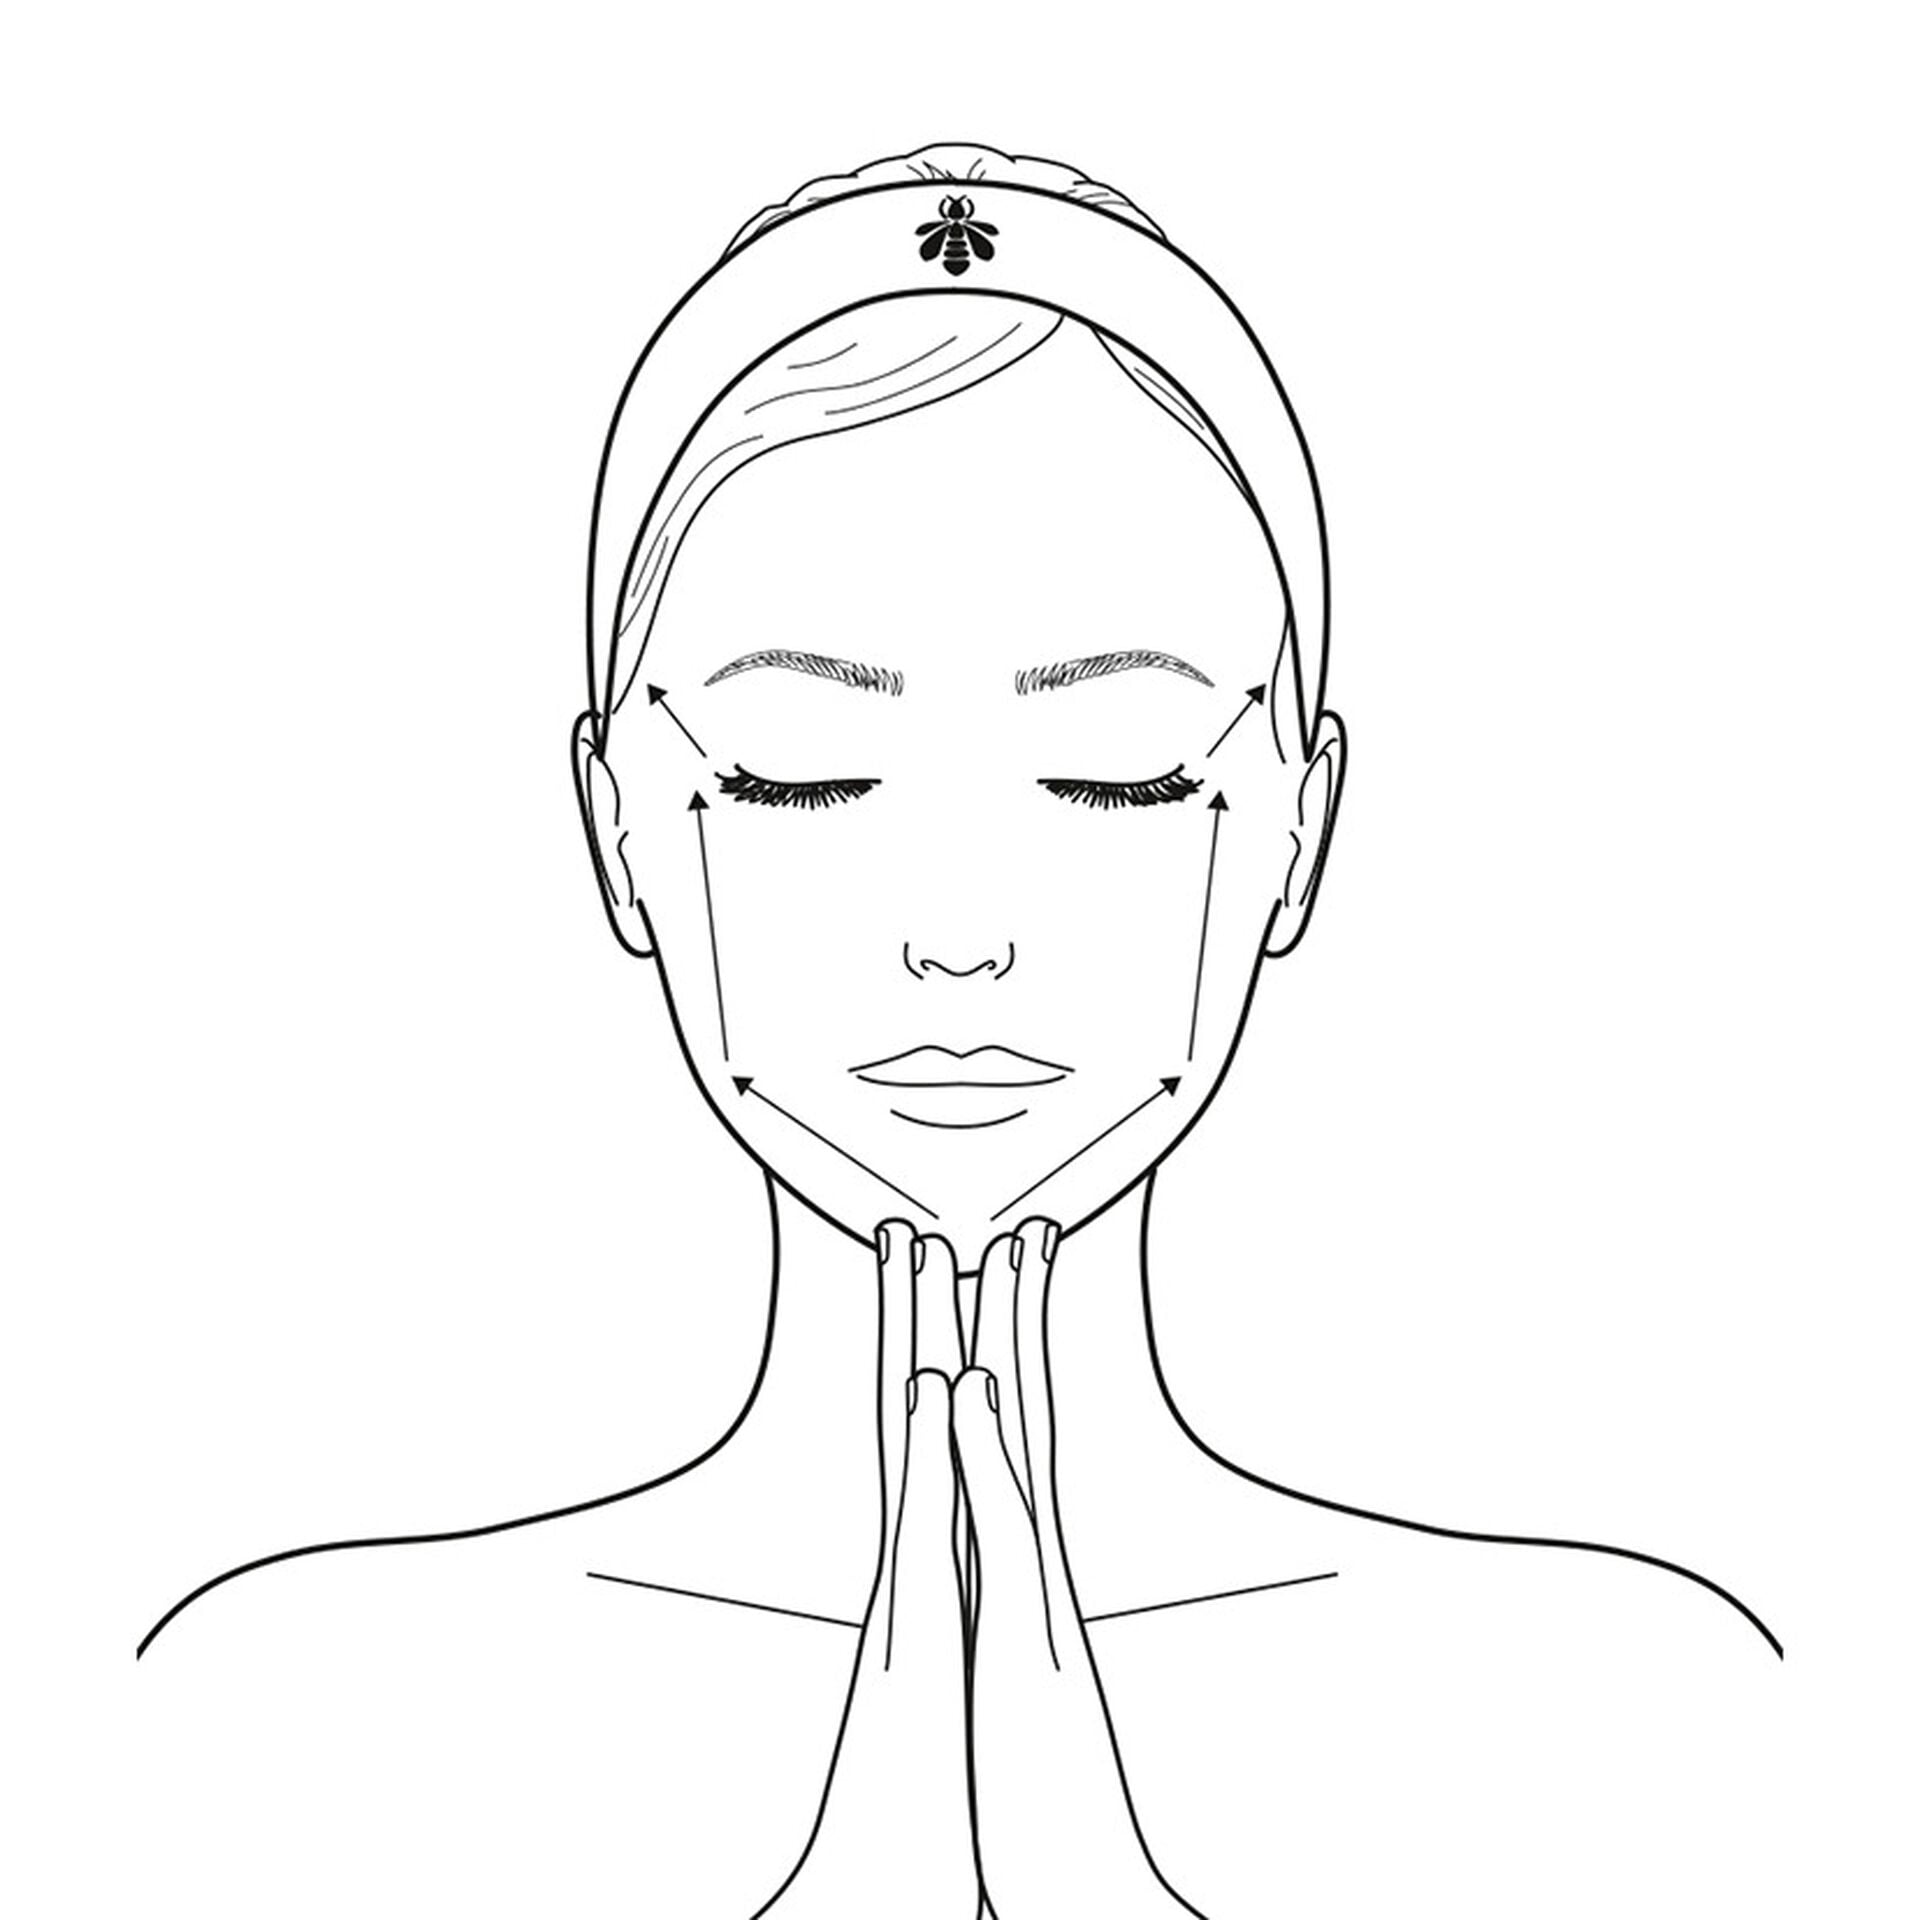
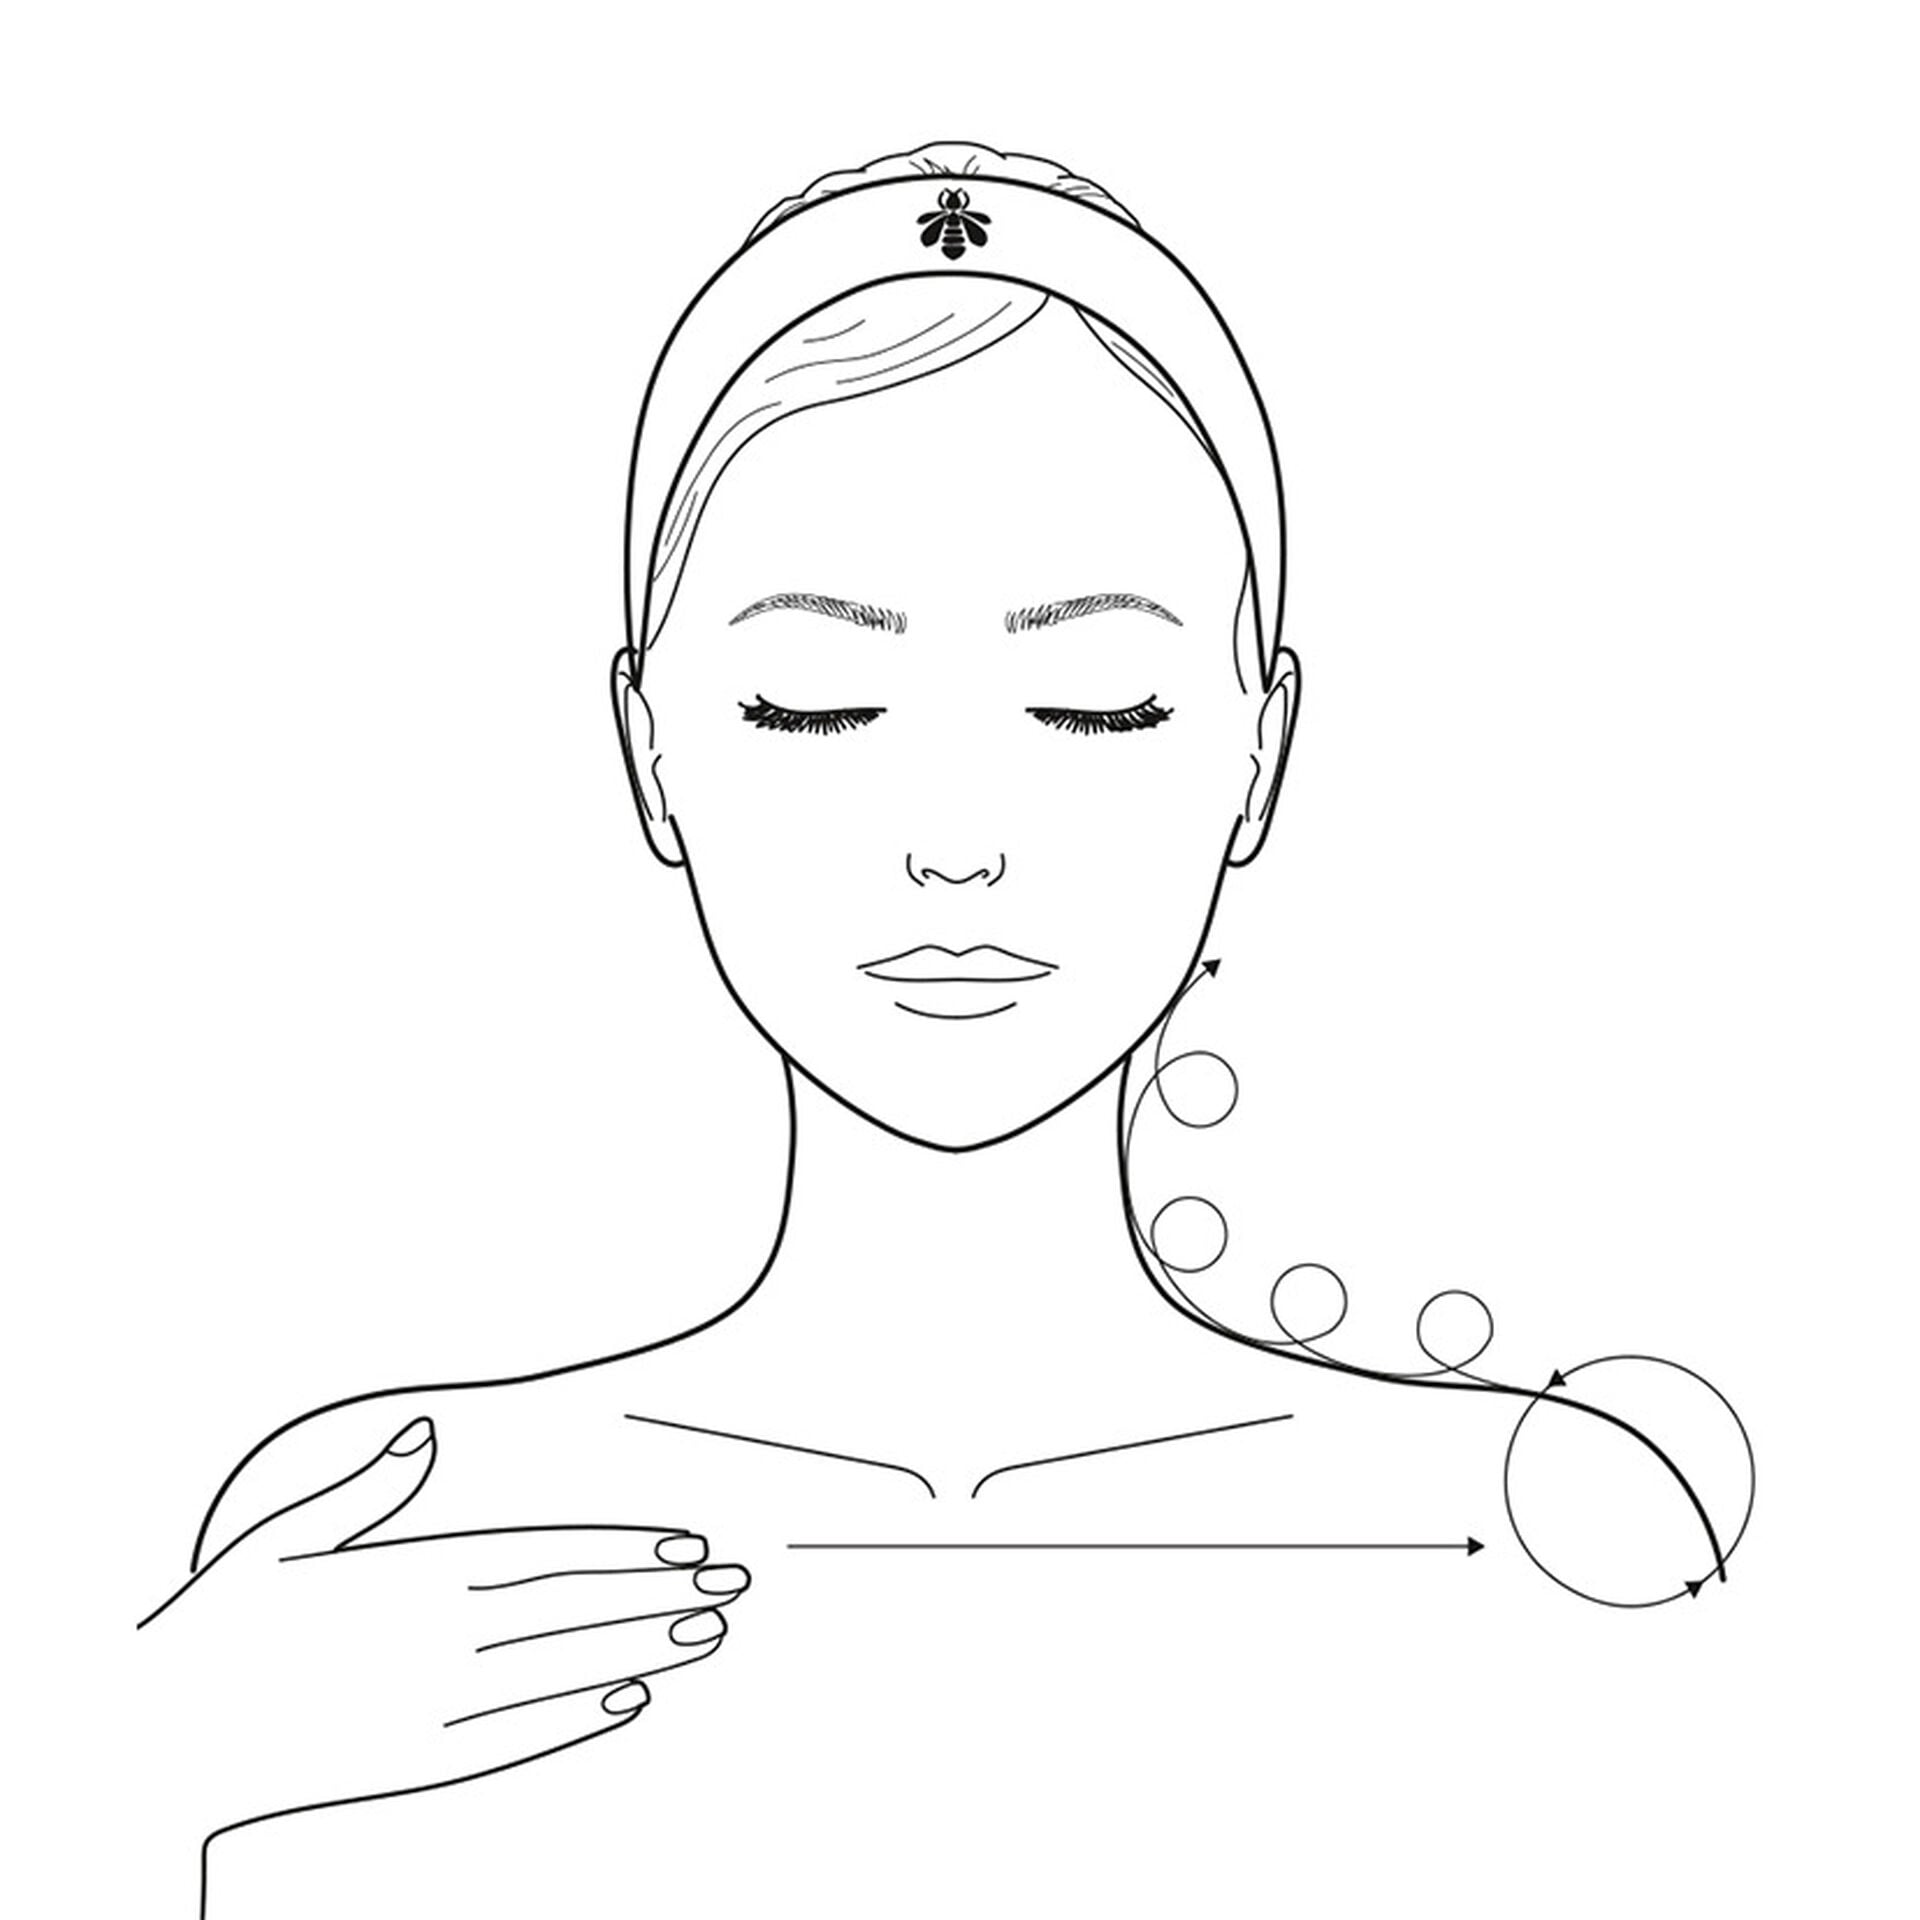
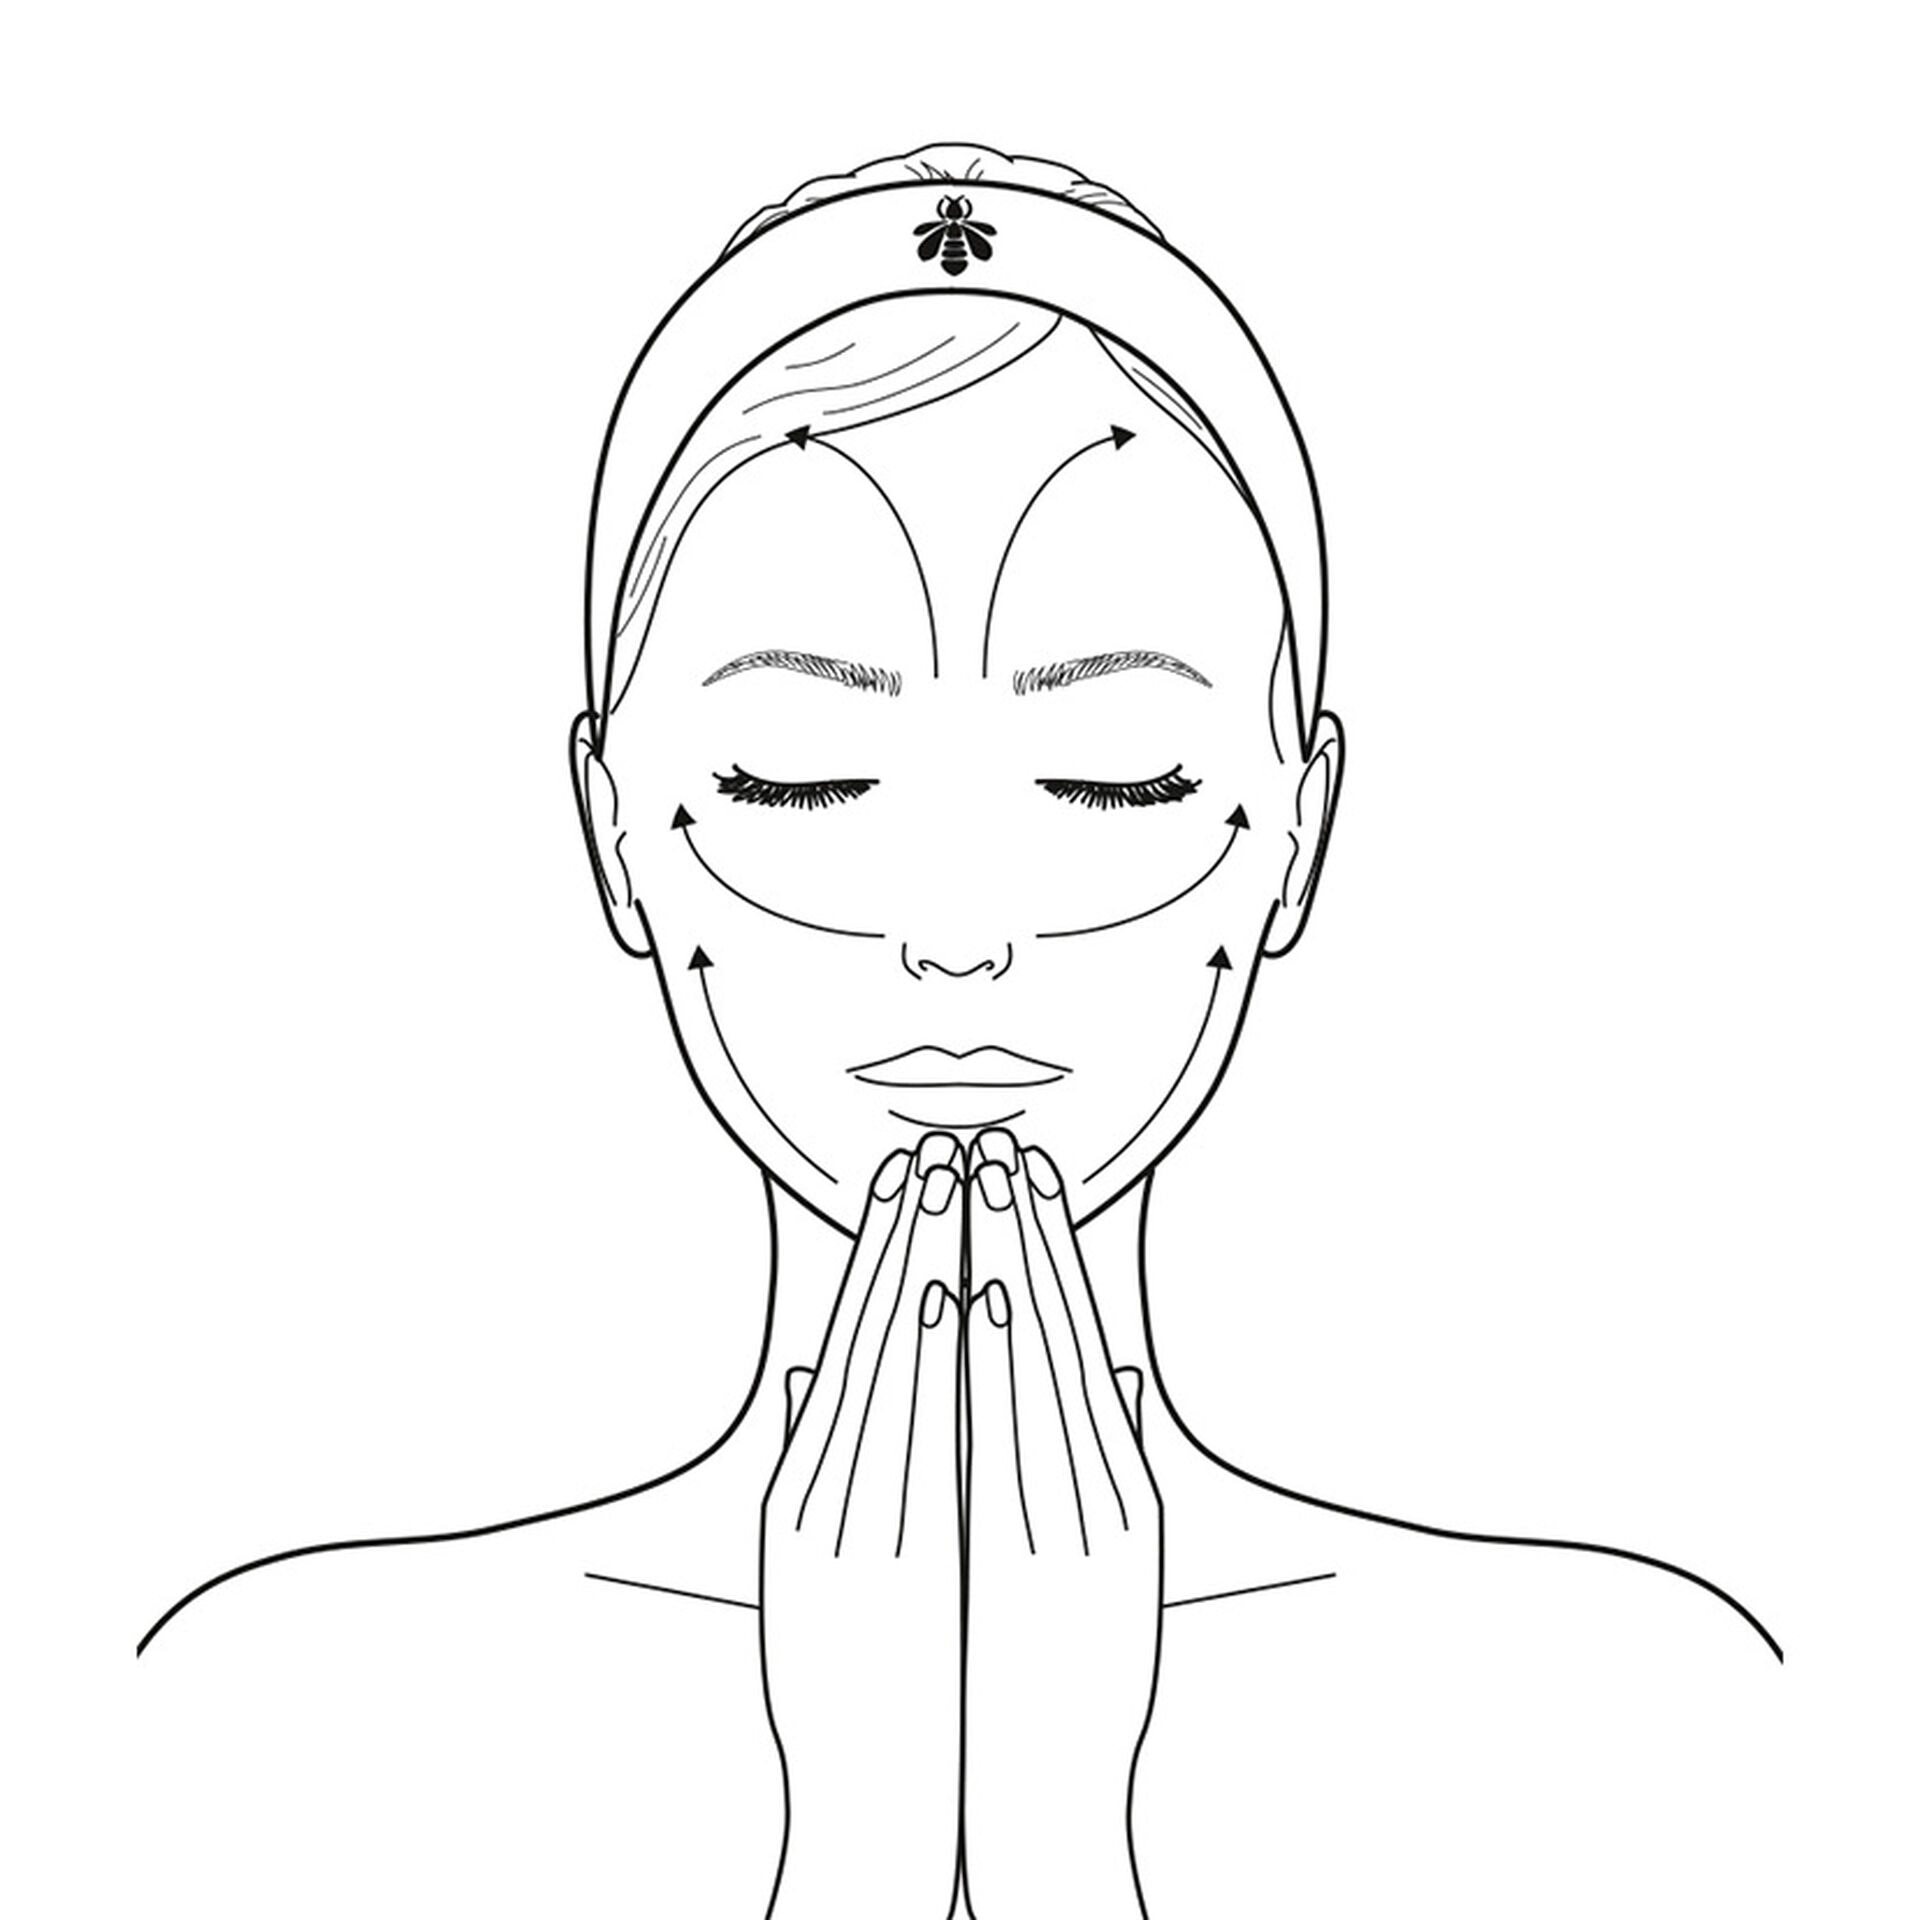
FACIAL CONTOUR AREA
LIFT
Reshape the facial contours and lift the cheekbones with one slow, deep stroke.
• Join the hands in prayer and rest the tips of the middle fingers on the chin. Separate the fingertips and, holding the hands flat, glide upwards towards the ears along the sides of the jaw.
• Turn the fingers towards the temples and use the palms of the hands to massage the masseters (jaw muscles) in a deep, smoothing, upward motion from the bottom of the cheeks up to the temples.
• Finish with an outward, smoothing stroke across the crow’s feet area.


FACIAL CONTOUR AREA
SCULPT
To sculpt the various muscles around the contour of the face, work area by area.
• Place the right thumb on the neck, just under the right ear, and turn the right index finger to rest it under the chin.
• With the index finger, apply deep smoothing strokes along the underside of the jaw from the chin to the earlobe.
• Repeat on each of the areas below, moving the thumb along the outer edge of the face:
Facial contour • Cheeks • Cheekbones • Crow’s feet
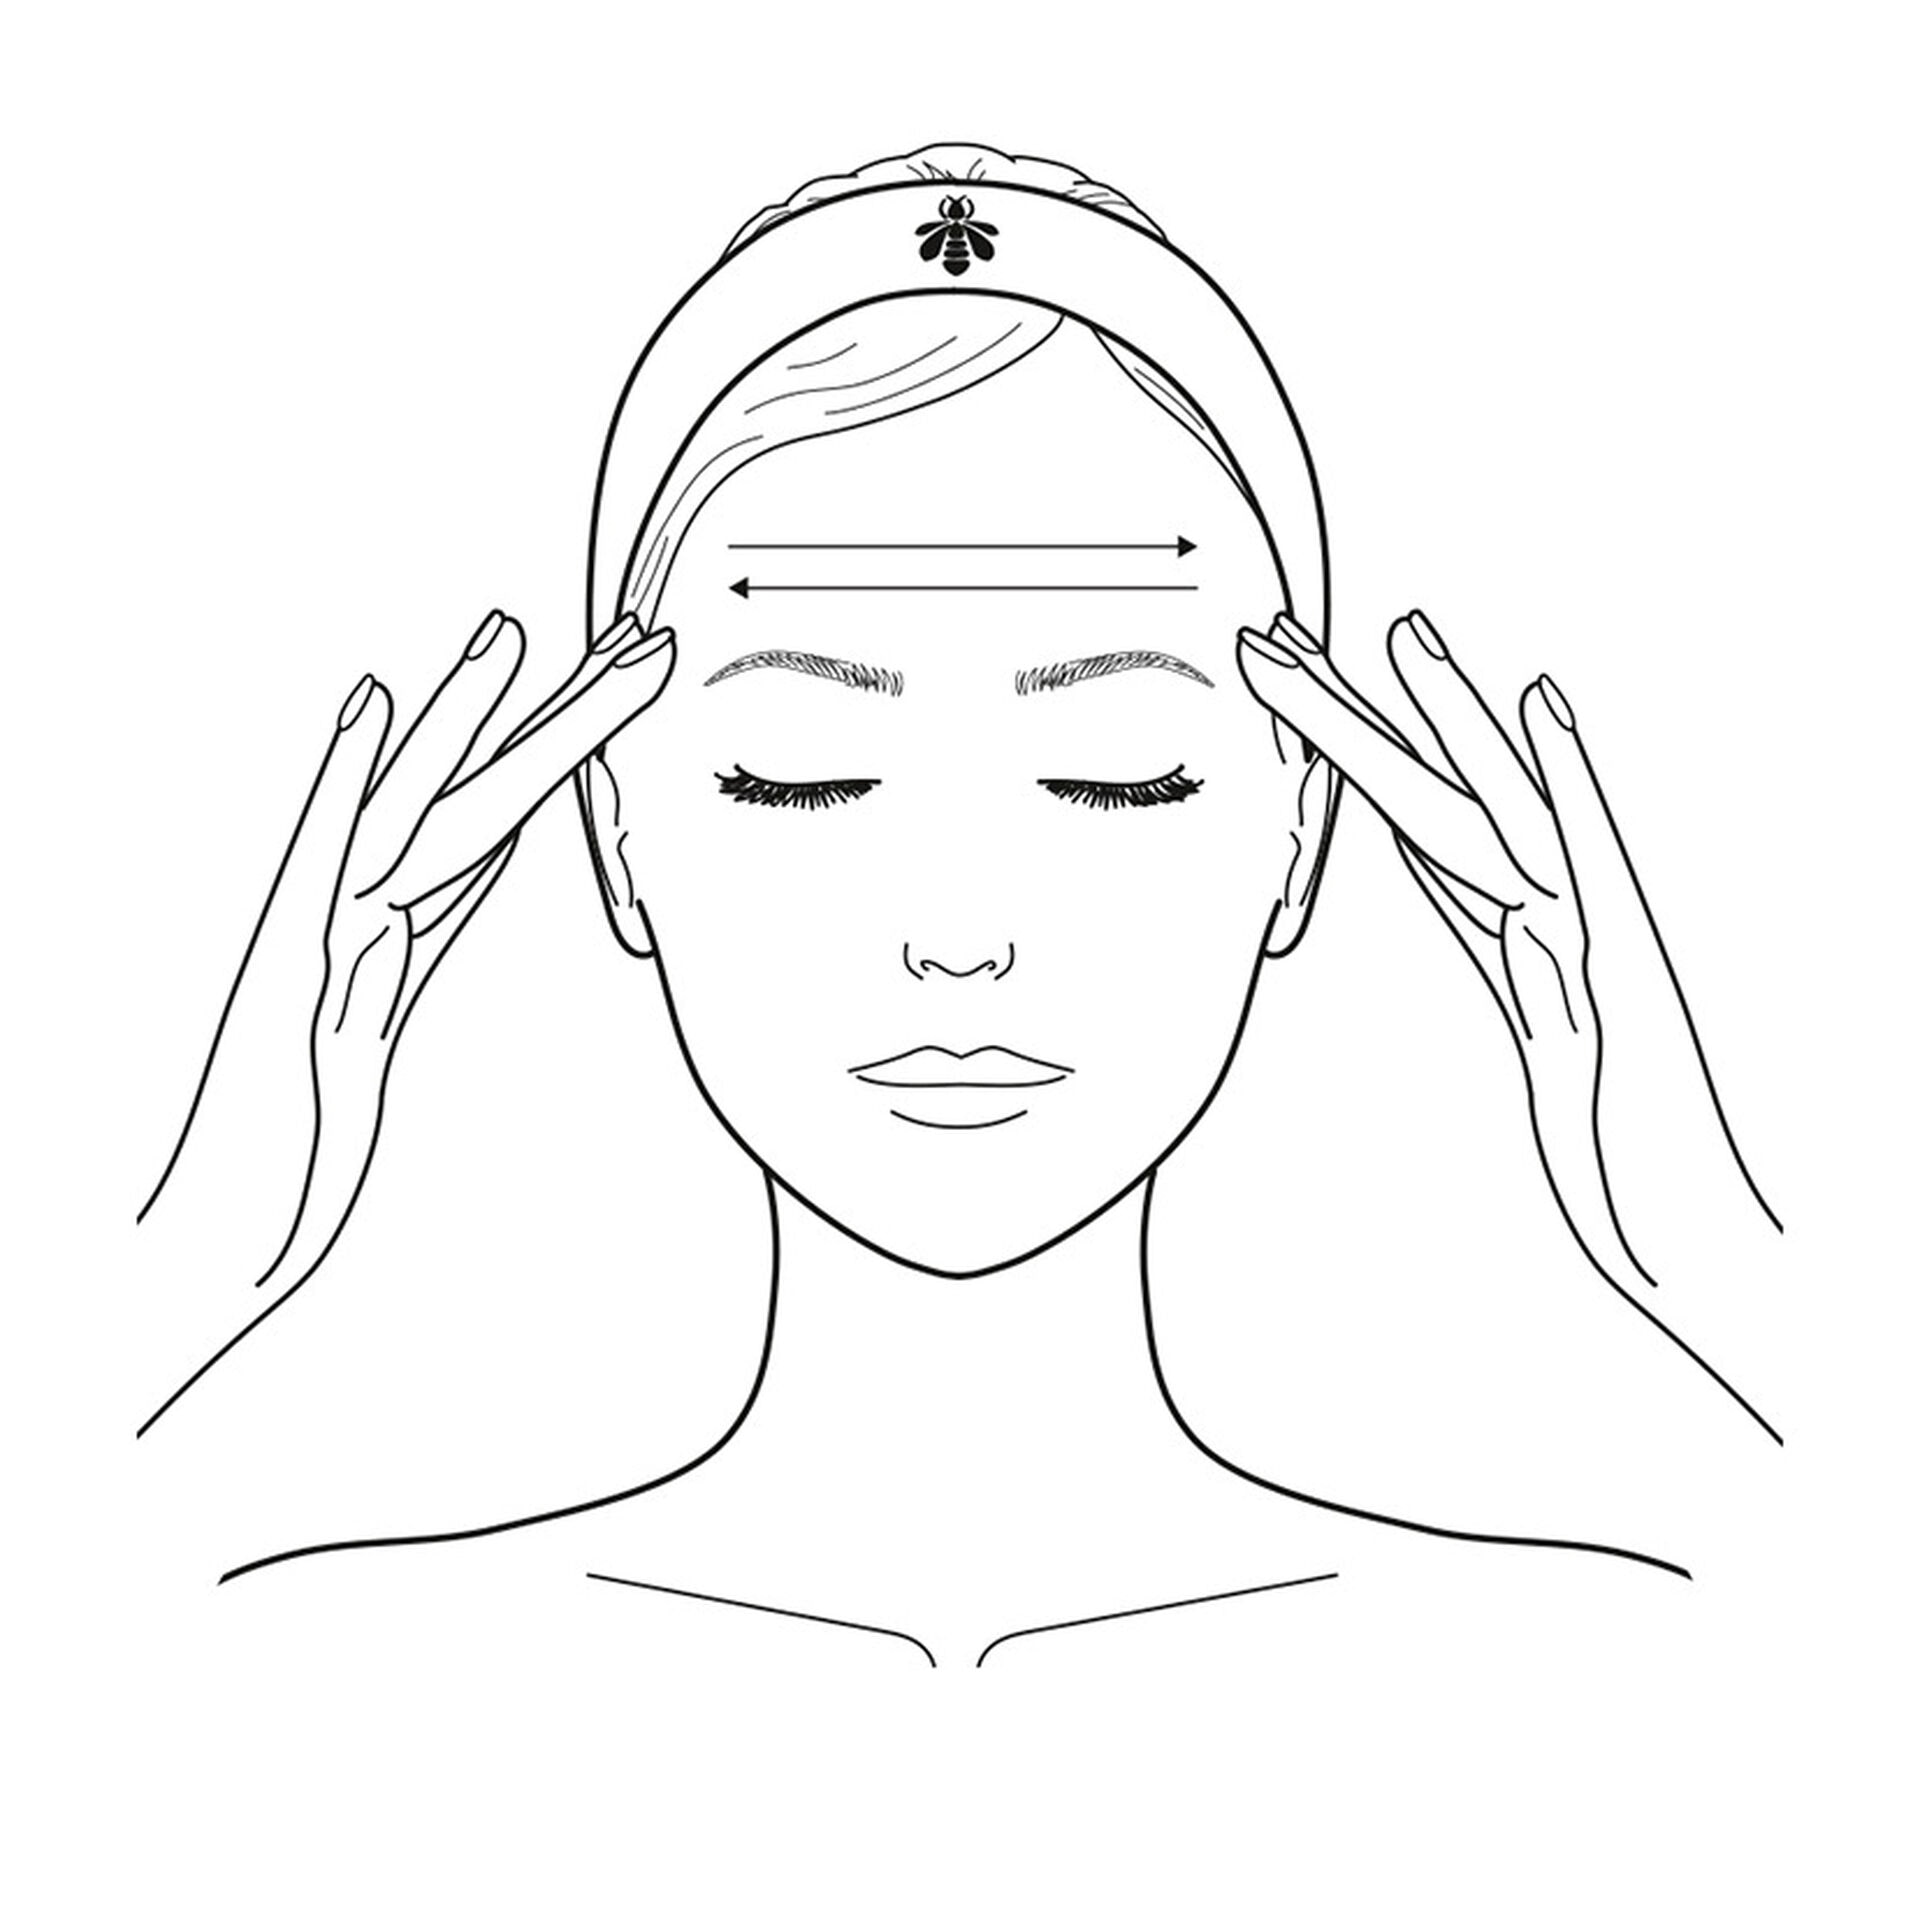
FOREHEAD AREA
DRAIN
Stimulating the blood and lymphatic flow in the forehead aides detoxification and cellular oxygenation.
• Using the outer edge of the index fingers, massage up and down the sides of the nose to the level of the glabella and across the lower forehead.
• Using the index fingers, apply smoothing strokes from the center of the forehead out towards the temples.


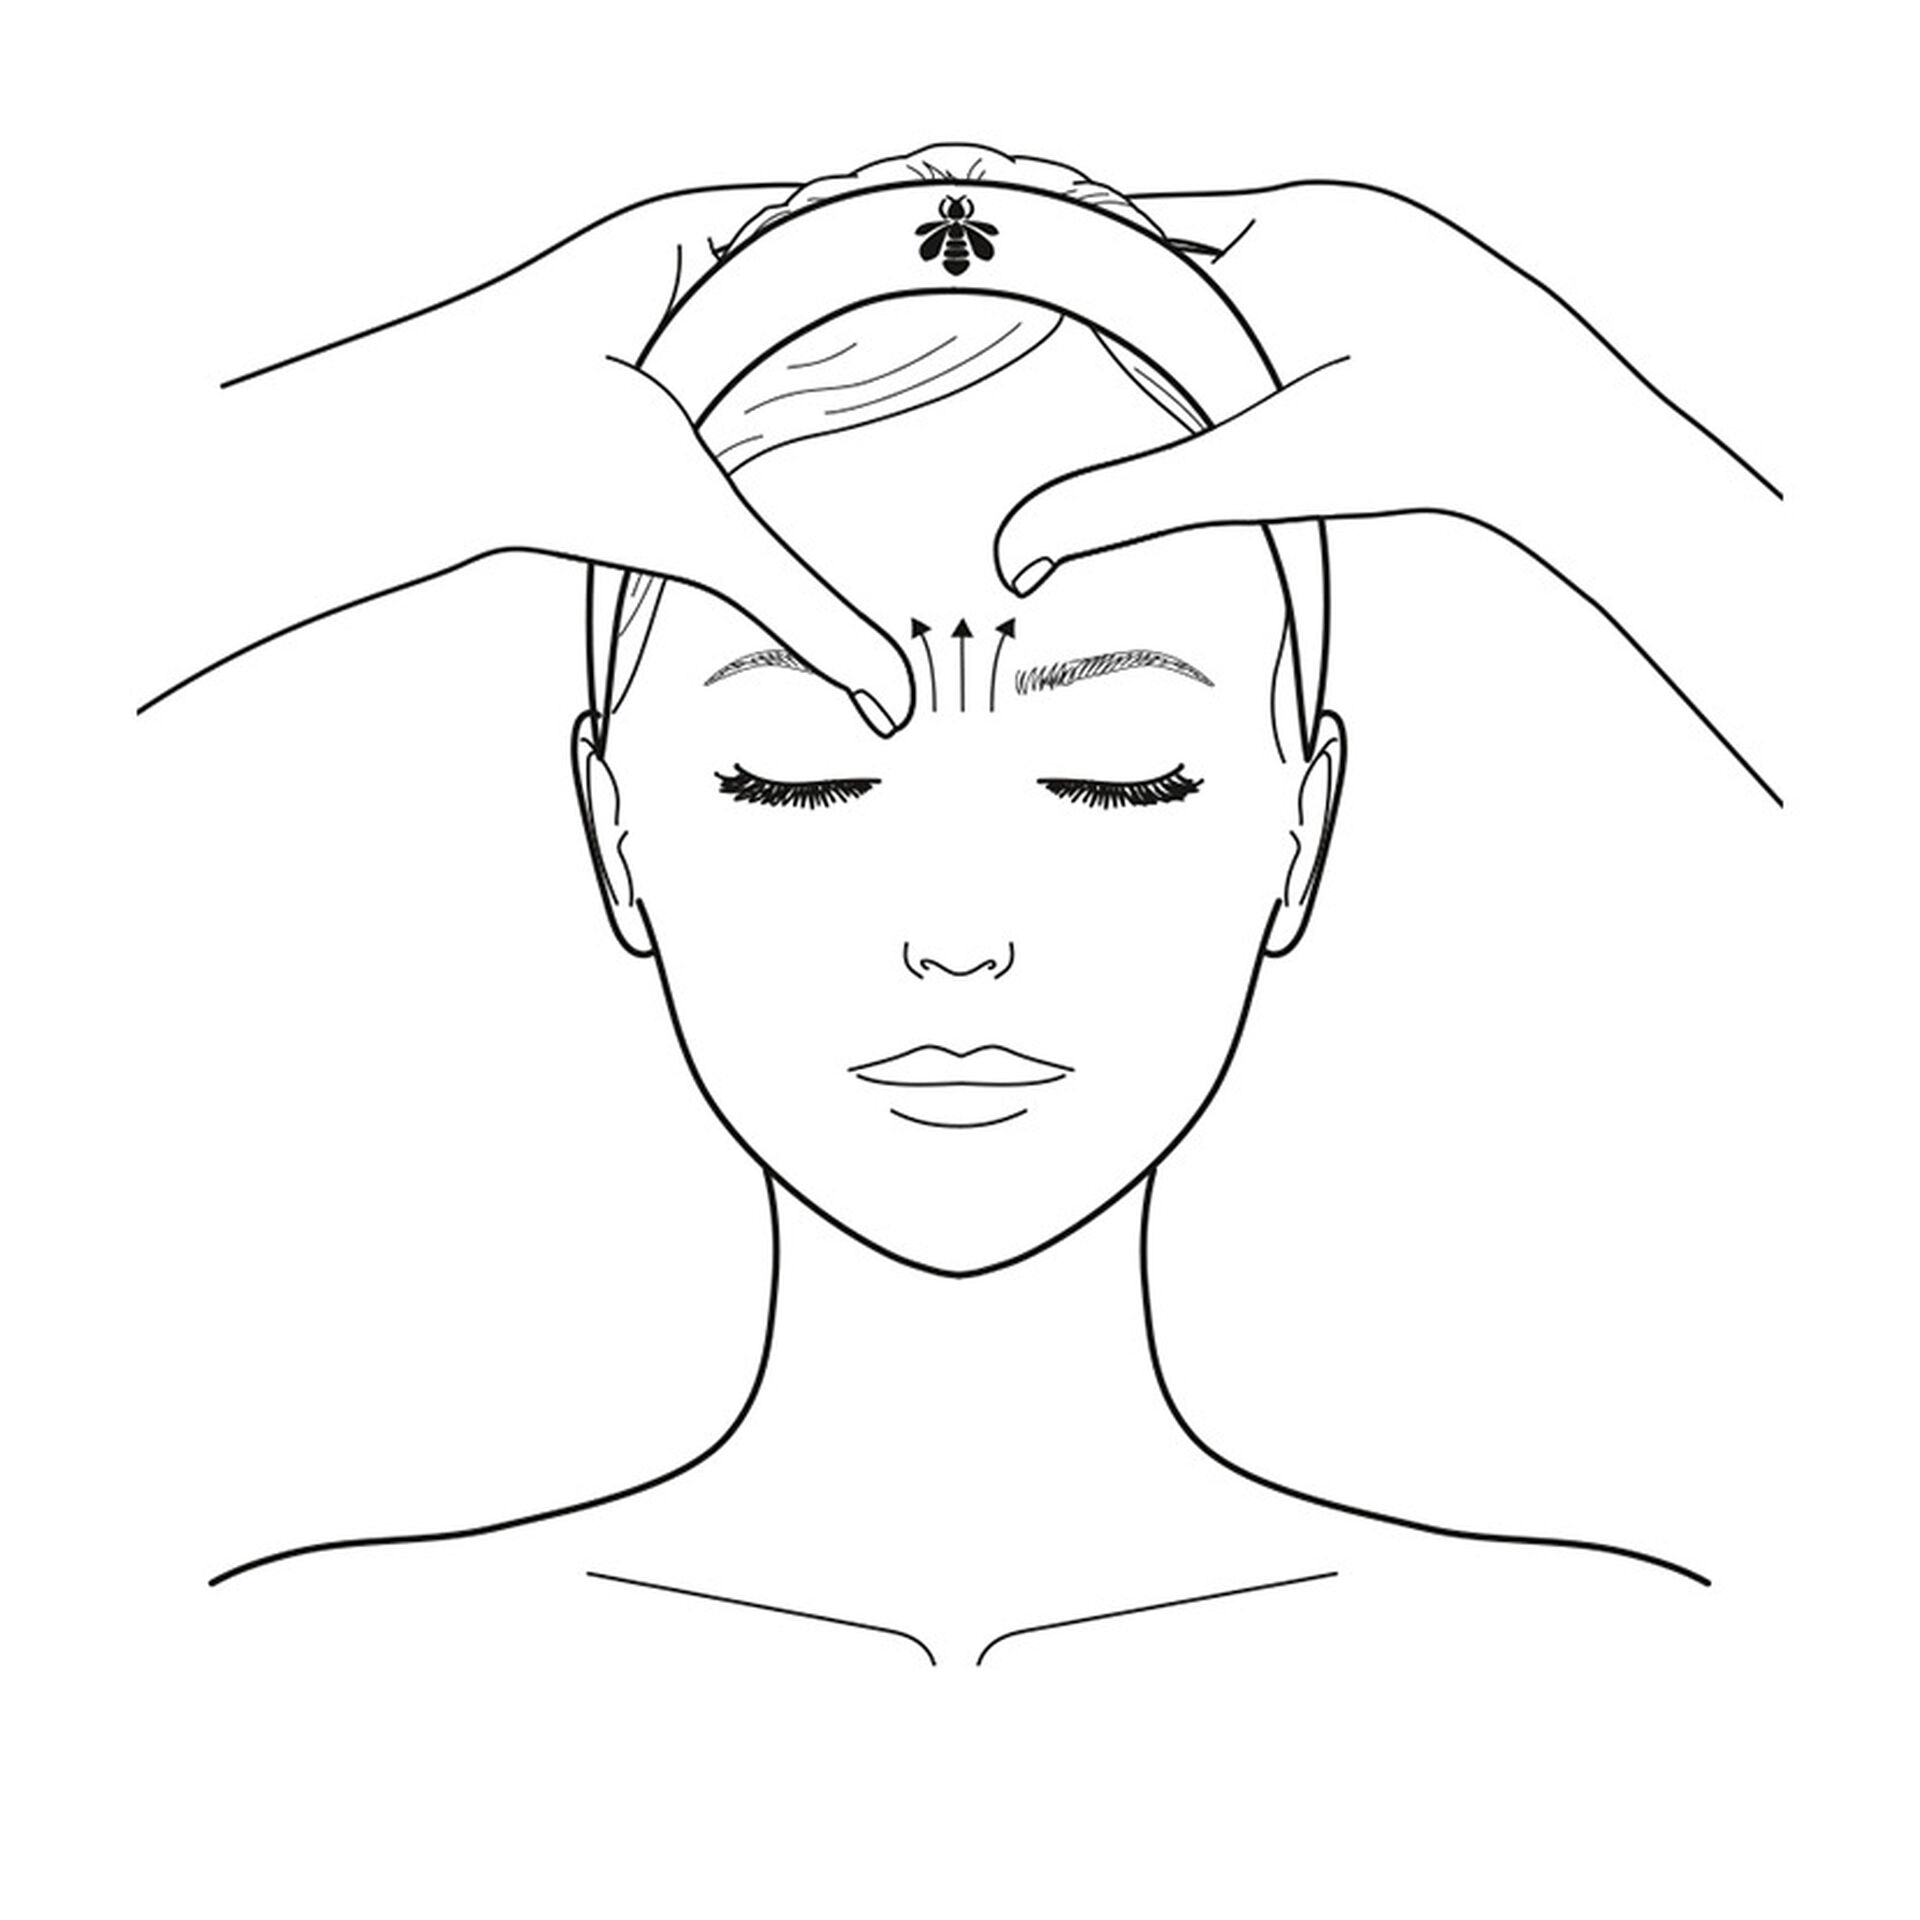

FOREHEAD AREA
RELAX
The most vulnerable area of the forehead is the glabella (the area between the eyebrows). Glabellar (vertical) wrinkles, commonly called frown lines, require intense relaxation work.
• Alternating between the right and left thumb pads, make small sweeping movements in an upward motion between the eyebrows, gradually working your way up to the hairline.
• Alternating between thumbs, work your way from the bridge of the nose to the inner right eyebrow and then the inner left eyebrow. Return to the midline to finish.
FOREHEAD AREA
SMOOTH
To smooth a forehead marked by expression lines, stress or fatigue, the forehead muscles must be relaxed with gentle, enveloping strokes.
• Perform a deep, smoothing movement from the left temple to the right temple, starting with the fingertips of the right hand so that, as they gradually move towards the opposite temple, they are completely flat along the length of the forehead.
• Repeat the movement, alternating between the right and left hand.

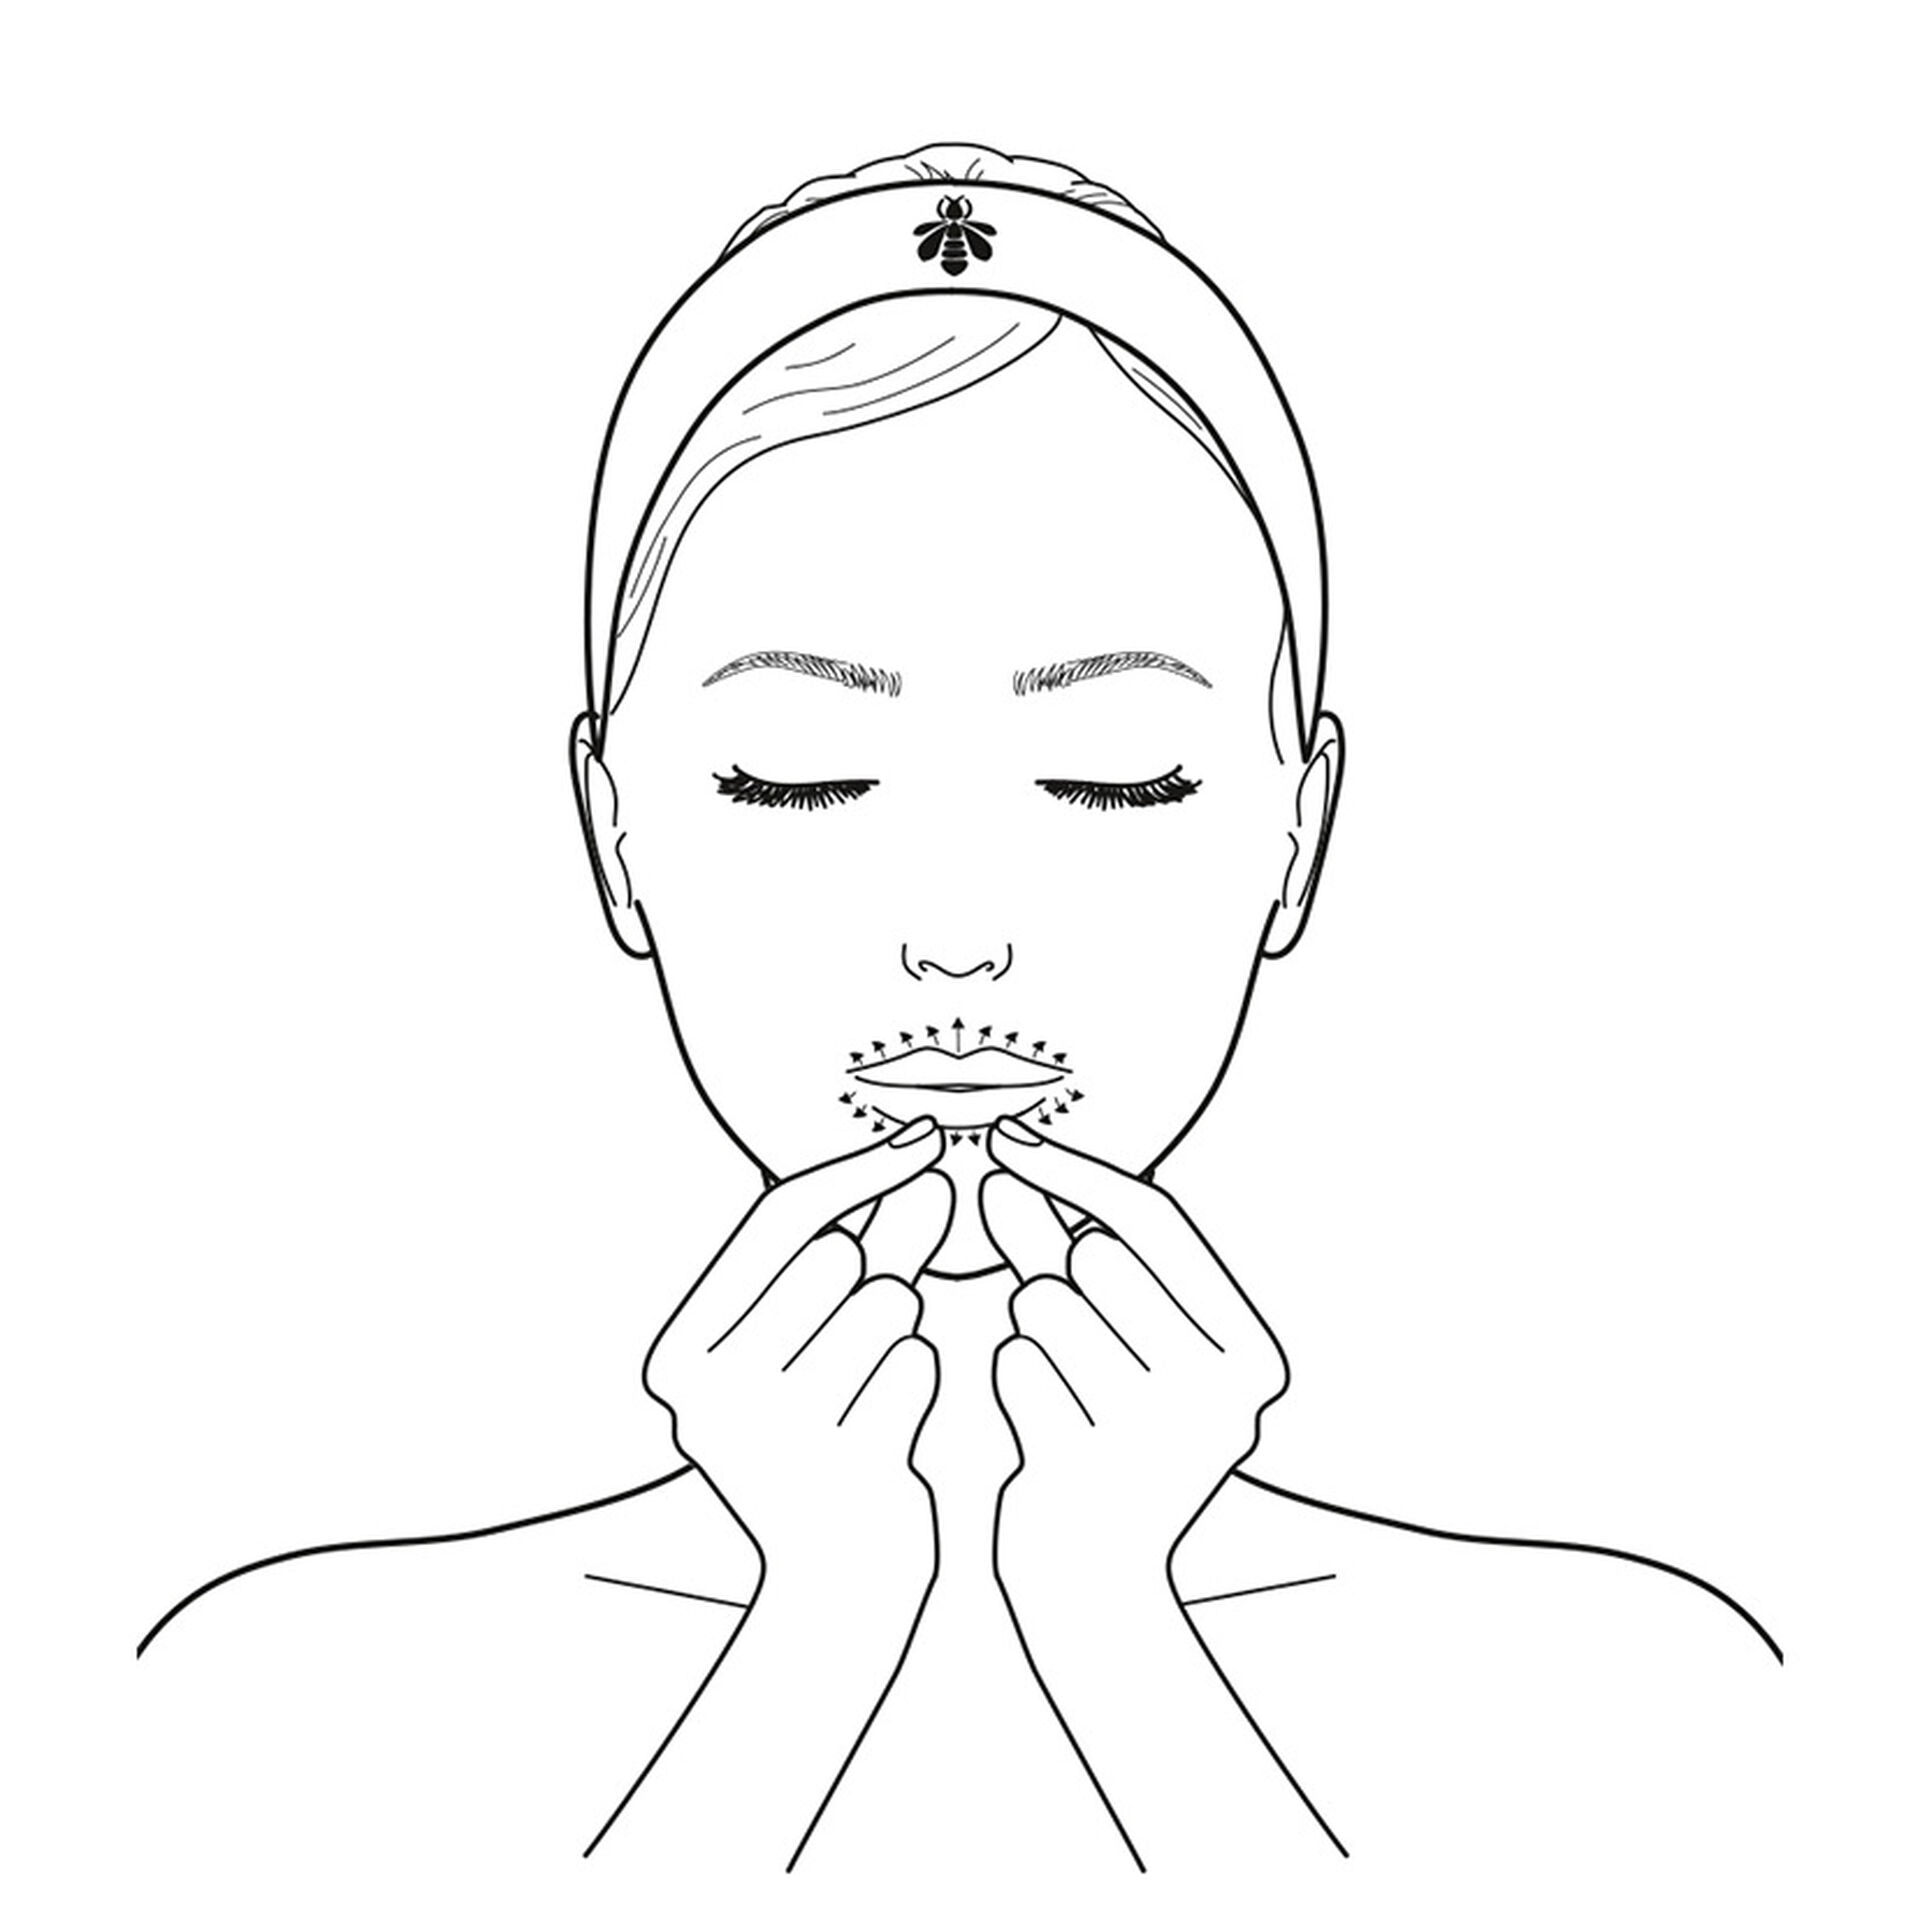

LIPS AREA
PLUMP
Pinching is a highly effective technique to create plump lips.
• Use the thumb and index finger of each hand to pinch the skin along the upper and lower lip line.
• POSITION 1: Position the tips of the index and middle fingers facing horizontally, then pinch and twist along the lip line.
• POSITION 2: Holding the index and middle fingers vertically, pinch the lip so as to cause the inner part to protrude slightly. Alternate between the right and left hand.
• POSITION 3: Holding the index and middle fingers vertically, pinch and twist along the lip line. Alternate between the right and left hand.
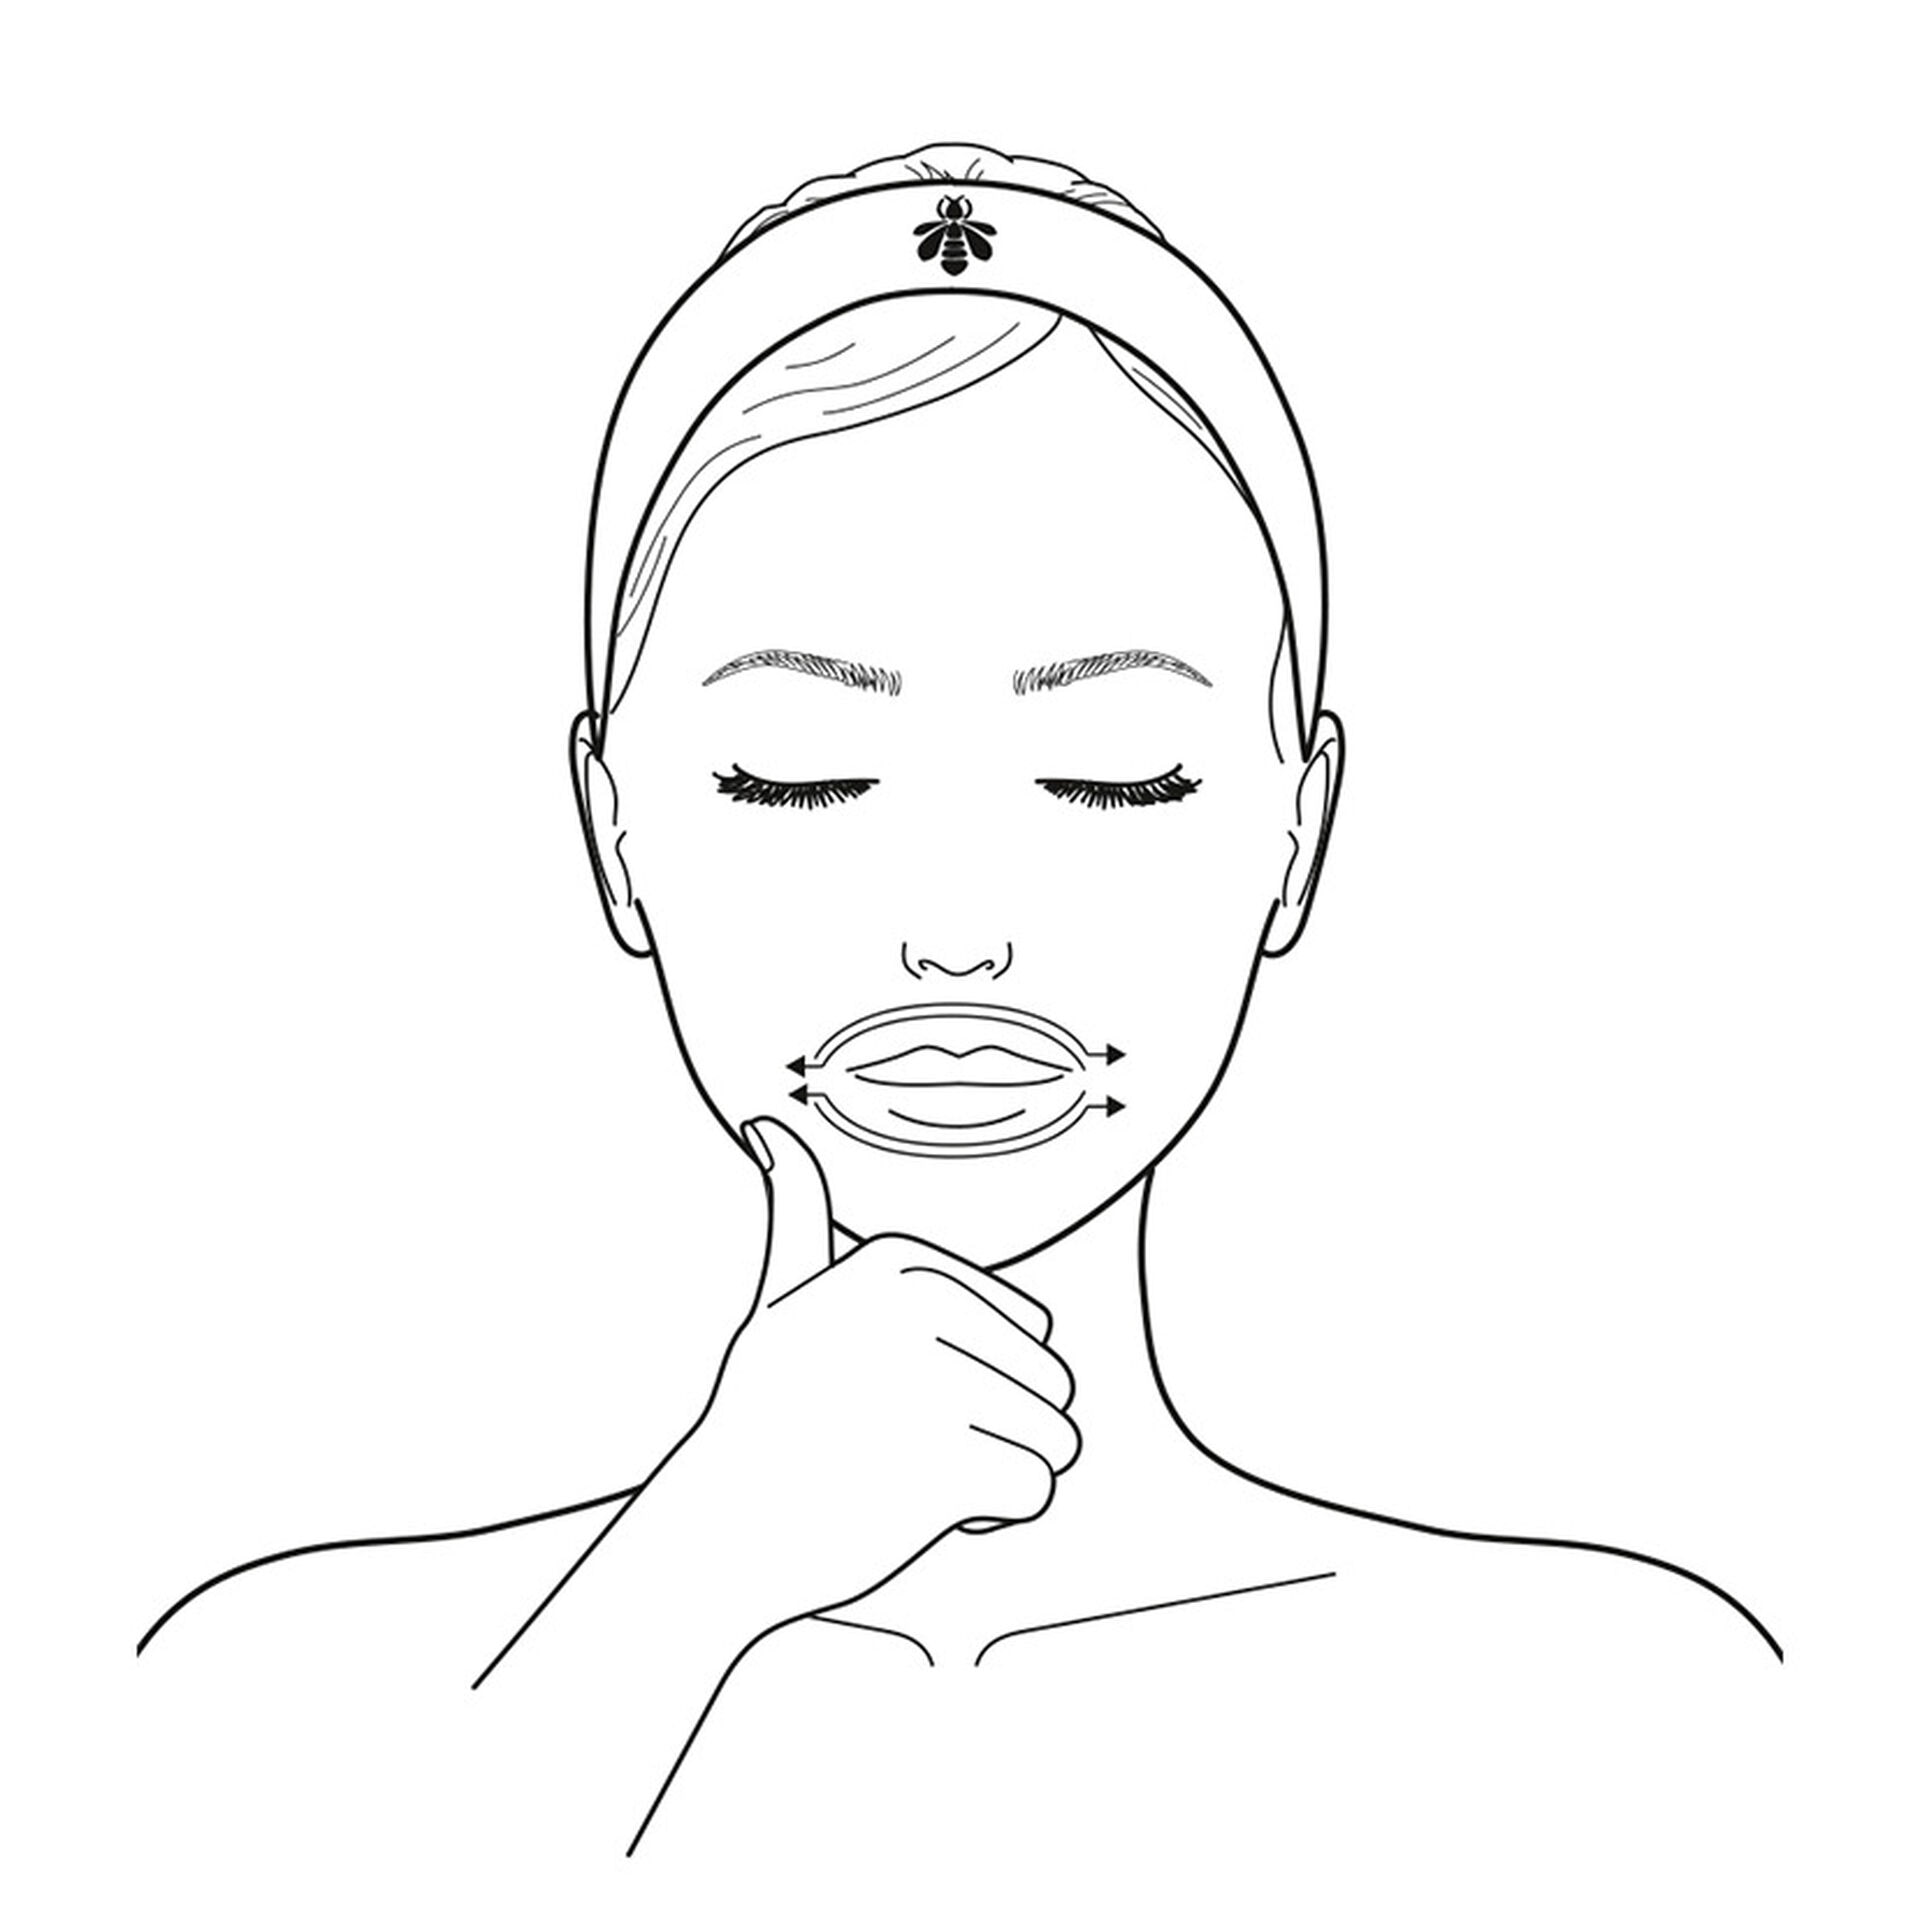
LIPS AREA
SMOOTH
To smooth wrinkles and fine lines around the lips, it is necessary to work deeply on the orbicularis oris.
• Pressing firmly on the orbicularis oris, slide the right thumb from the right to the left corner of the mouth along the lower lip contour.
• Finish by stretching the nasolabial fold towards the left ear.
• Repeat these movements on the upper lip contour.
• Repeat both steps with the left thumb, this time working from left to right.

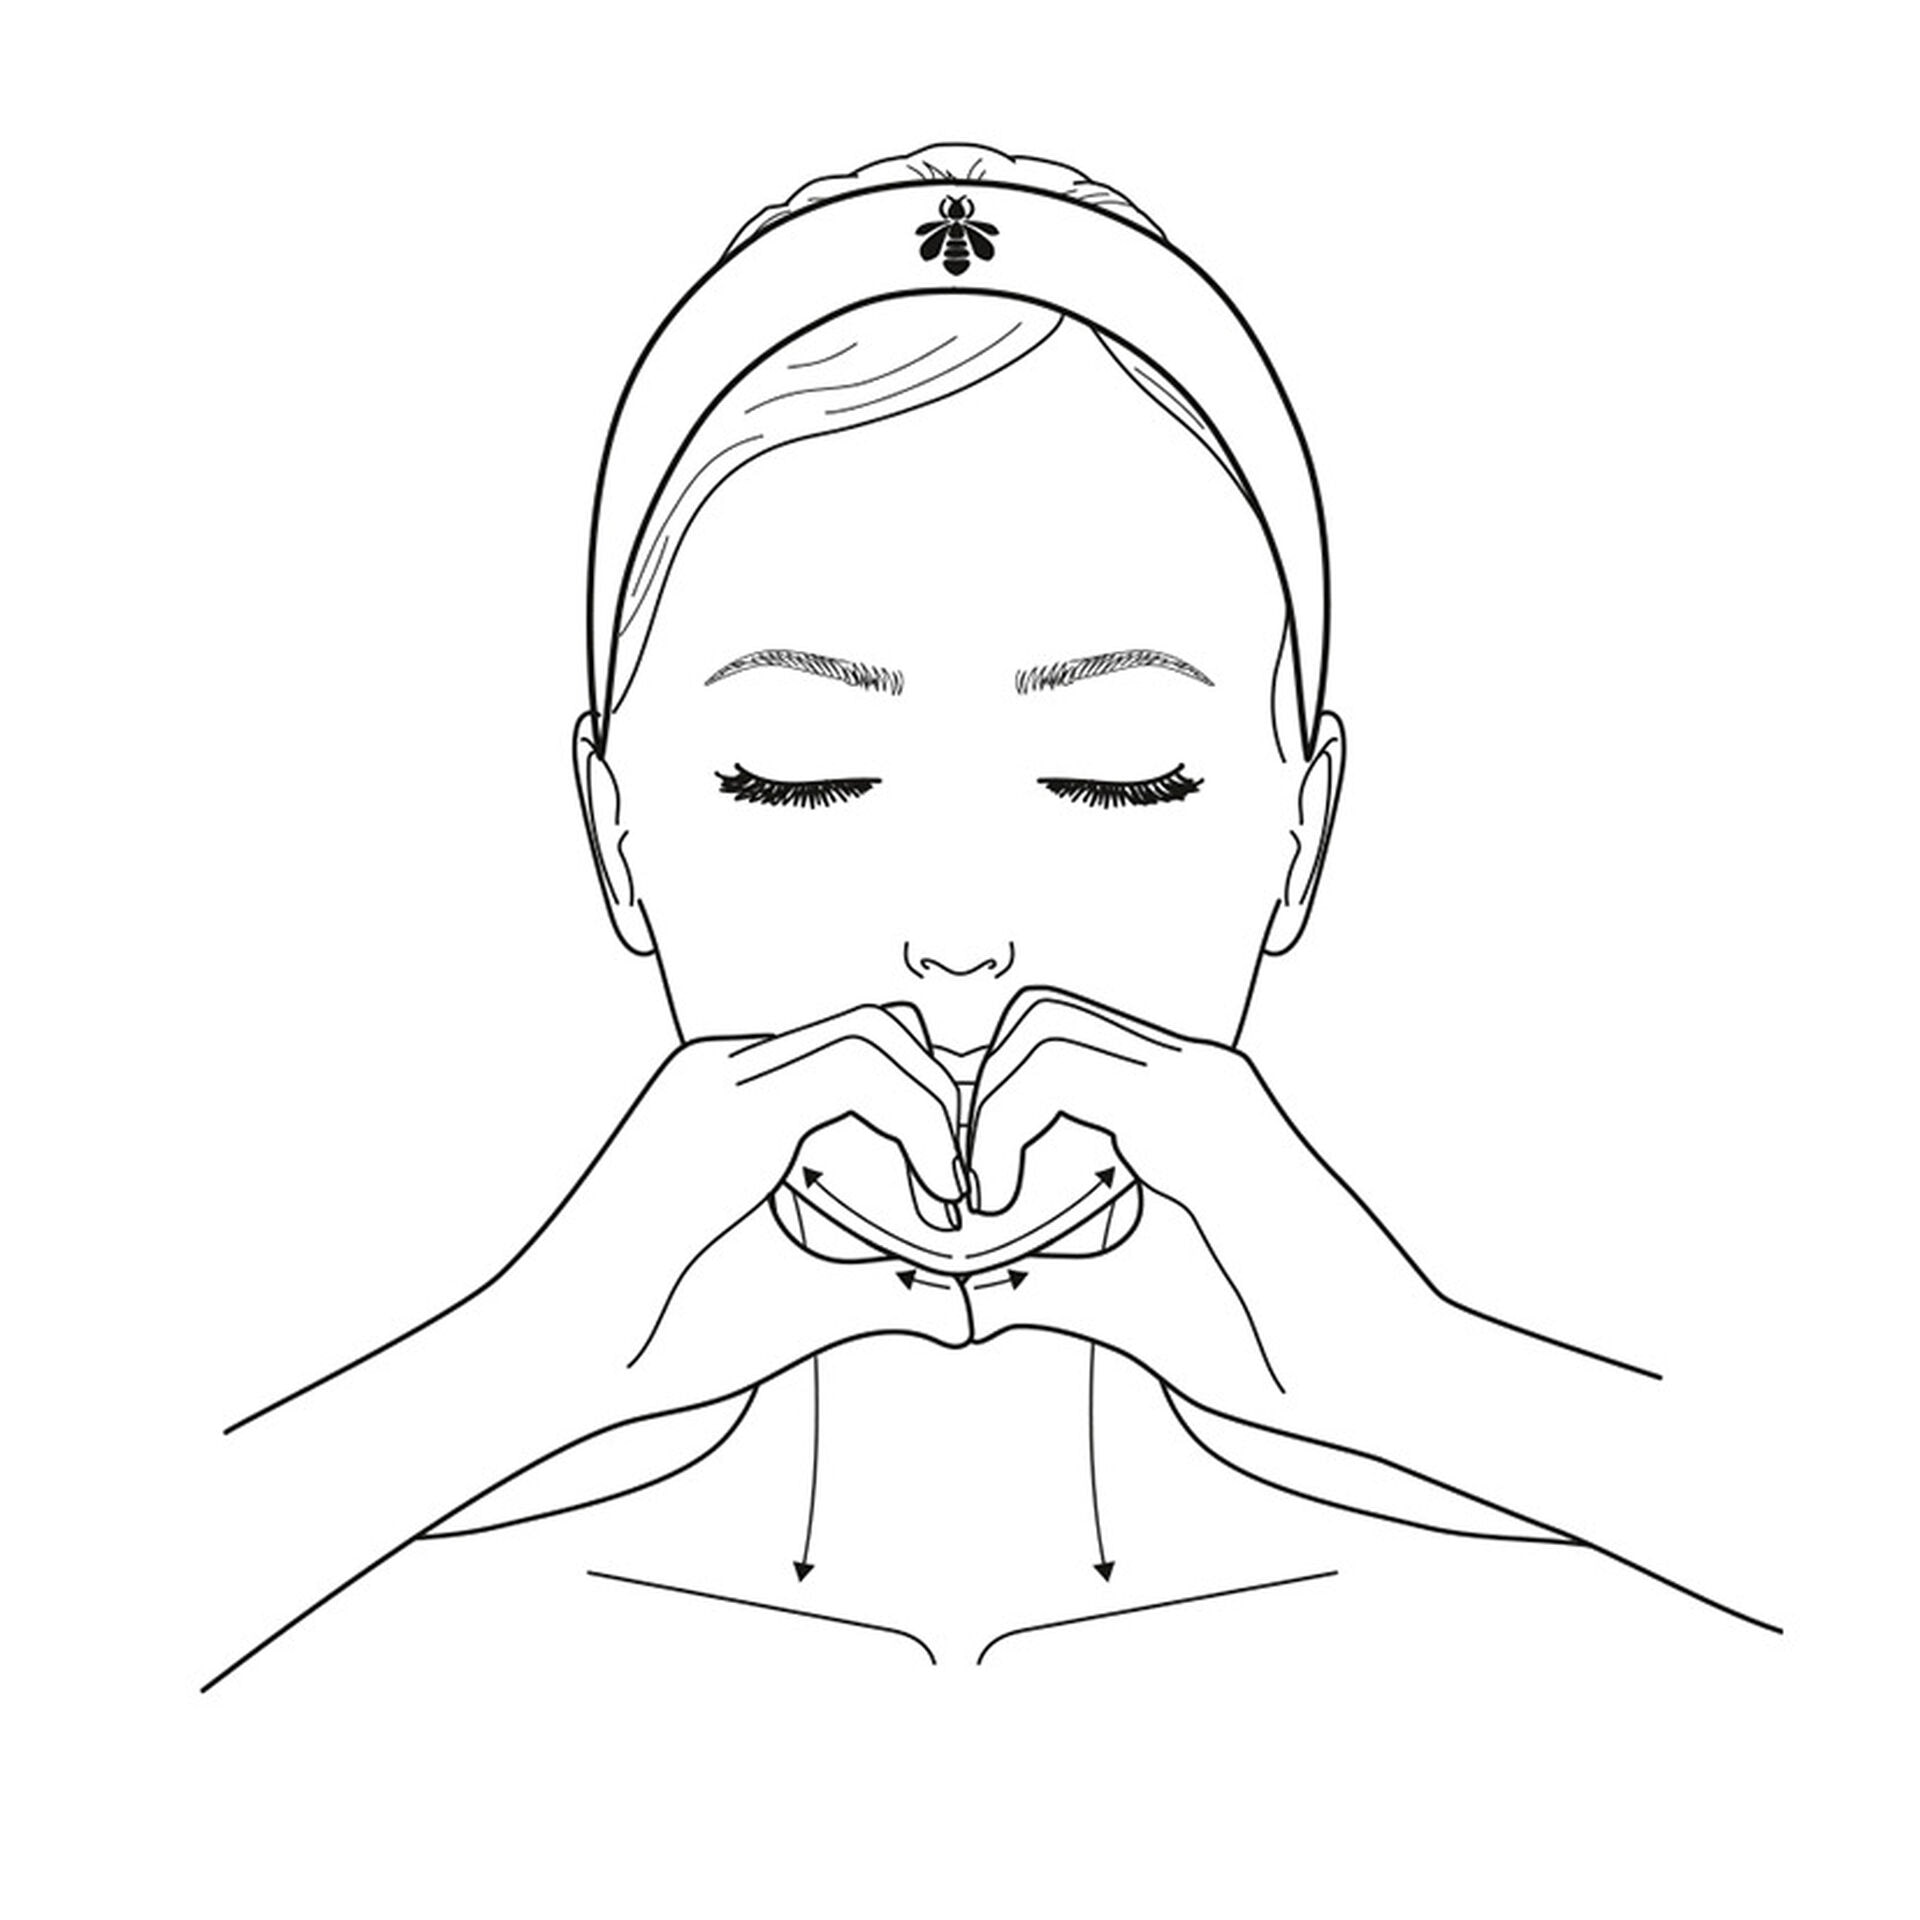

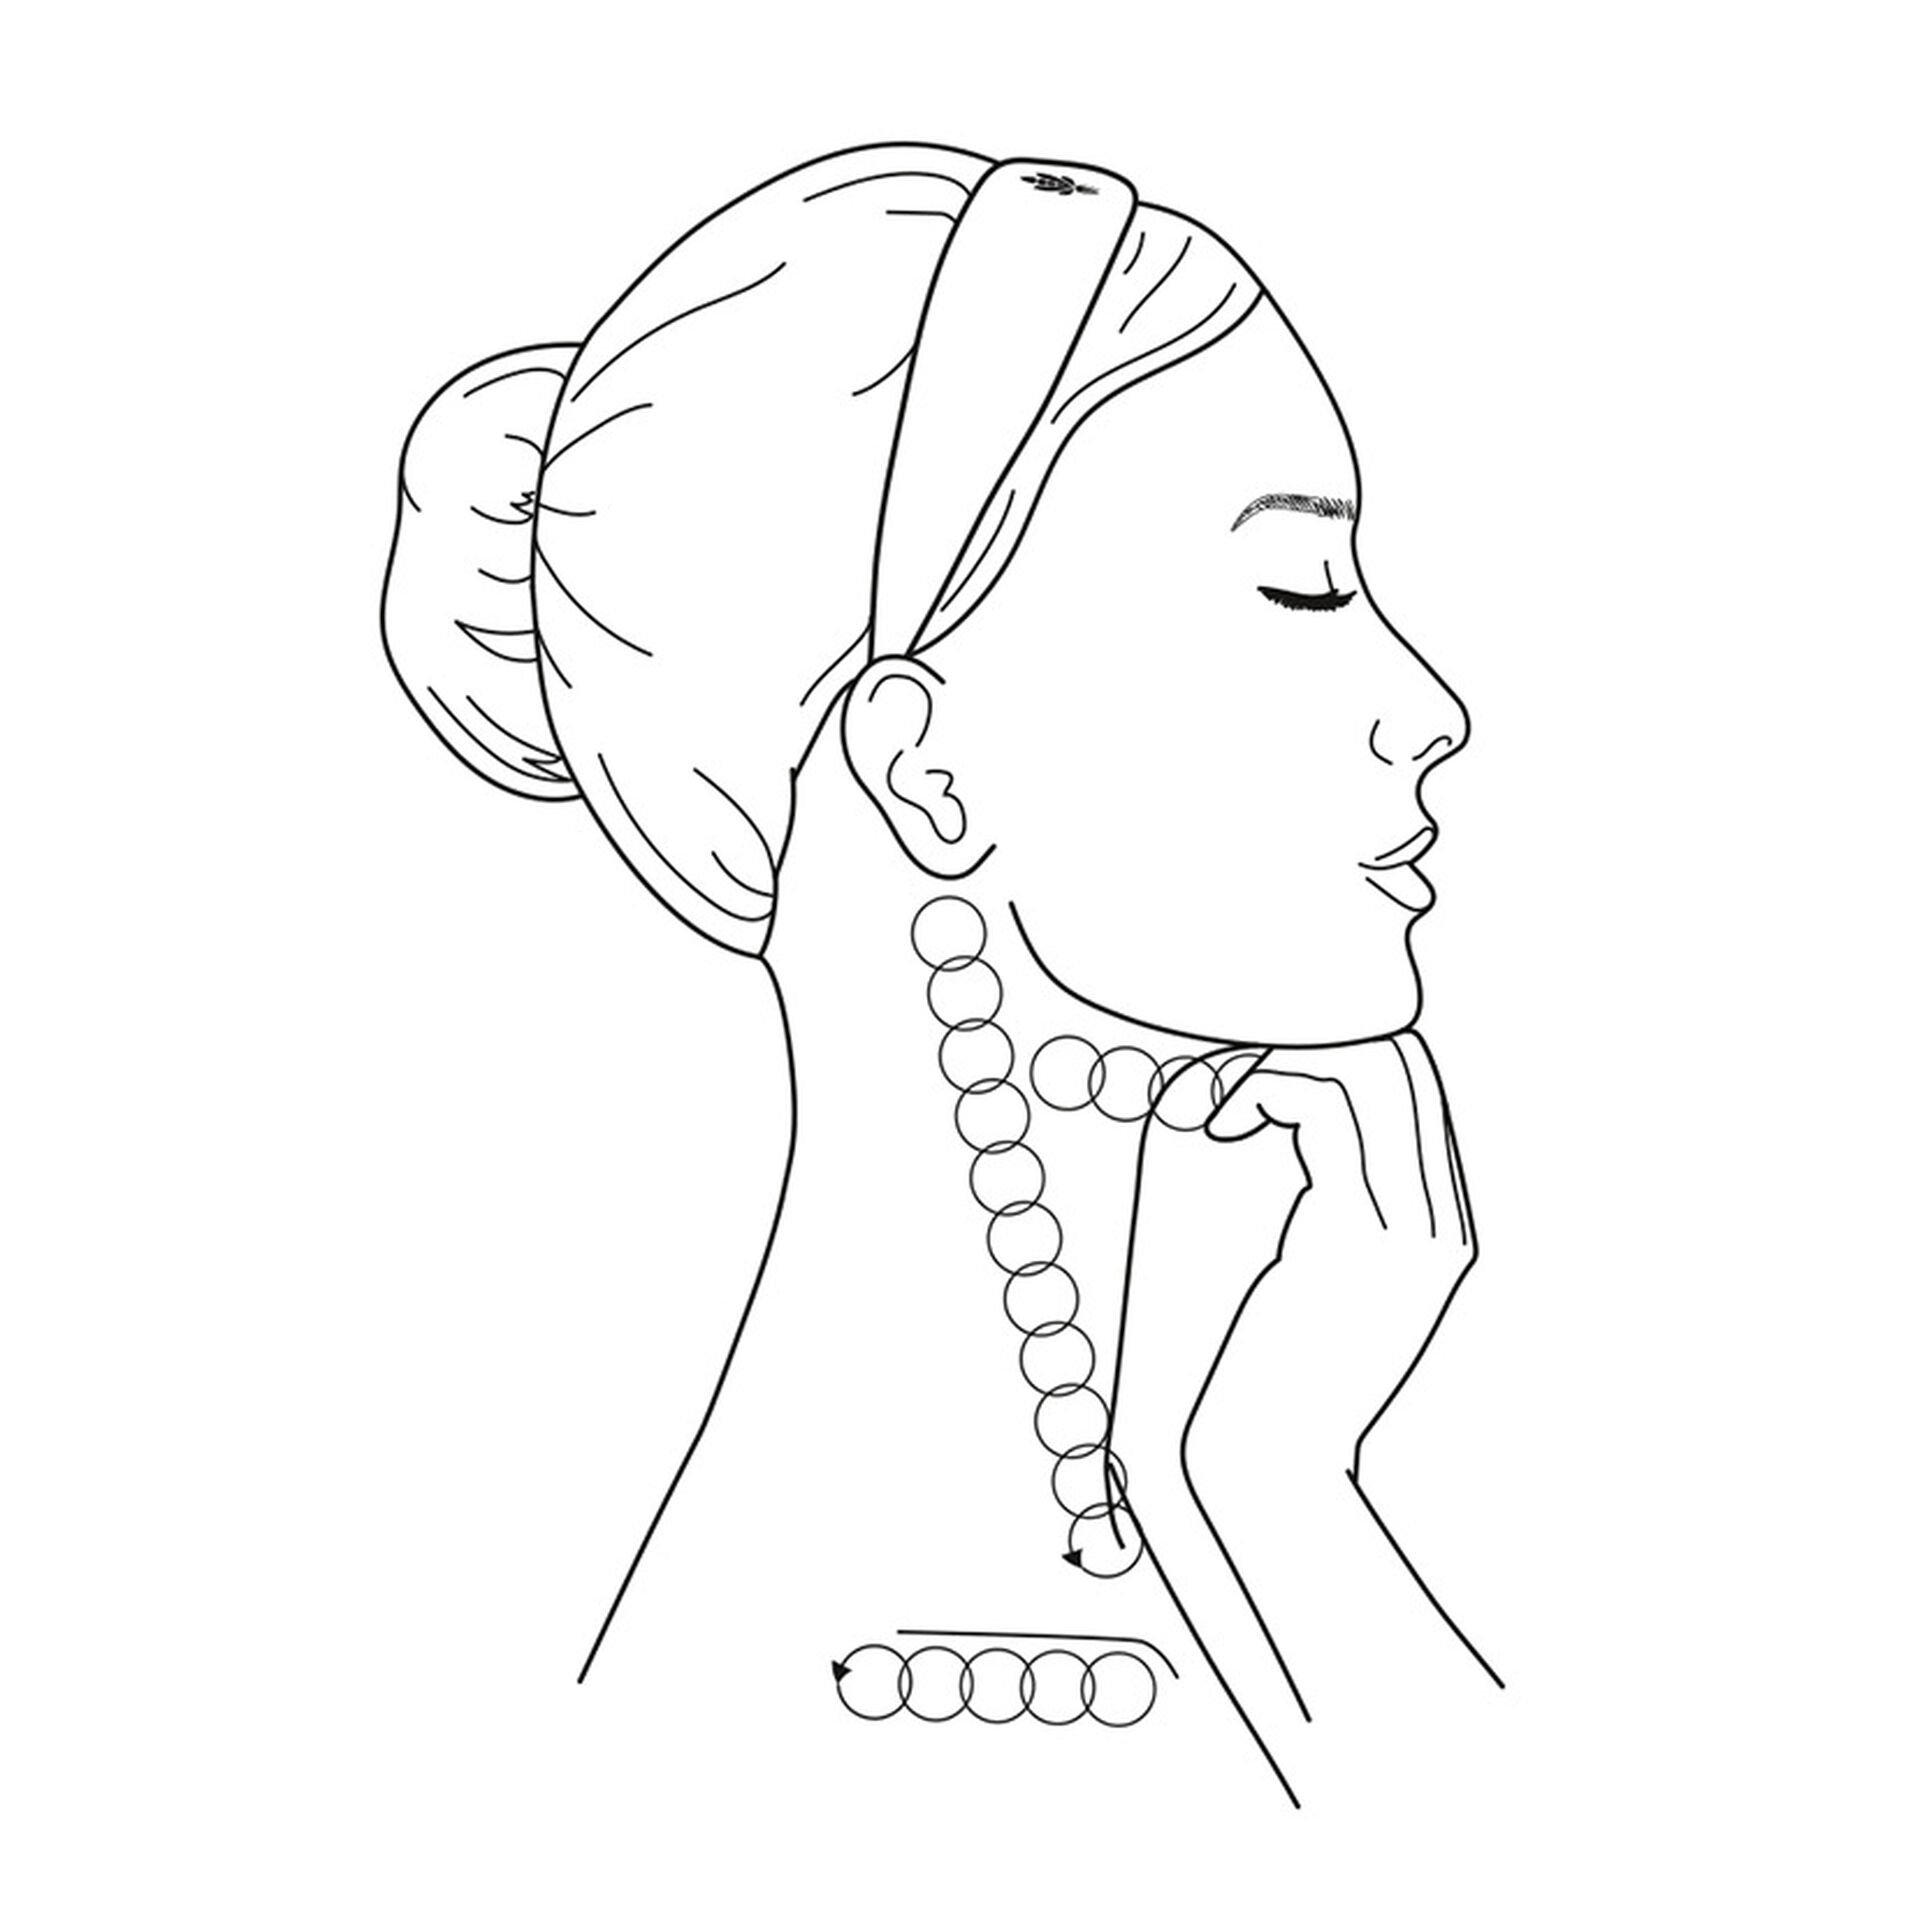
NECK AND DÉCOLLETÉ AREA
DRAIN
To effectively combat sagging, it is recommended to drain the muscles that extend from the sternum to the collarbone.
• Make a heart with the hands with the fingers facing each other and the thumbs forming the bottom point.
• Place the fingers on the chin and the thumbs underneath it.
• Alternating between the right and left thumb, perform deep, smoothing, fan-like strokes on the underside of the chin.
• Firmly pinch the jawline between the thumb and index fingers and glide upwards from the chin to the ears.
• Starting below the earlobes, move down the sternocleidomastoid (neck muscle) towards the collarbones using the backs of the folded fingers.
NECK AND DÉCOLLETÉ AREA
LIFT
Deep, rolling movements to lift and smooth the neck and décolleté.
• Make a fist with the right hand and place beneath the chin. • Using firm pressure, perform slow circular movements with the fist along the underside of the jaw towards the left ear.
• With the same circular movements, work along the left sternocleidomastoid (neck muscles). Then smooth the muscle from top to bottom with your knuckles. Alternate between the left and right hand.
• Repeat both steps on the right side of the neck, this time with the left hand.
• Finish with circular movements across the entire upper chest, using the knuckles of both hands simultaneously.


NECK AND DÉCOLLETÉ AREA
RELAX
For a supple head position and a beautiful décolleté, it is important to take time to feel each stroke.
• Place the right hand flat on the décolleté, slide it firmly across the décolleté and draw several circles around the left shoulder.
• Bring the hand to the trapezius (upper back muscle) and knead firmly and deeply to relax the muscle.
• Once at the neck, slide the hand upwards pressing the left base of the skull to finish.
• Repeat with the left hand, starting under the left shoulder.
SENSORY APPLICATION
Performing specially-designed massage techniques when applying a Guerlain product, be it a milk, a scrub, a cream, a serum or an oil, is an essential step in preparing your skin to receive the active ingredients. These sensory application massages will relax your muscles and boost natural drainage for optimal absorption.
• Warm a dab of cream between the fingertips and apply it with both hands at the same time.
• Slide along the jawline from the chin to the ears, from the side of the nose to the temples and from the third eye towards the hairline, then downwards back to the temples.
• From the third eye, draw a large circle around the eyes and finish at the temples.
• Apply a dab of cream on and under the nose.
• Slide the fingertips of the right hand underneath the left side of the jaw, and move gently along the neck down to the décolleté. Repeat on the right side of the jaw using the left hand.
ADVICE: With each stroke, take a deep breath and, at the end of the stroke, breathe out deeply and apply pressure.


THE SKINCARE COLLECTION
Discover the best sellers and new arrivals among our skincare collection.


